Before I get started with the test game I need to make one other point about the Hostile Tactical A.I. (HTAI) product. When I mentioned the shards I forgot to mention that the cards, Aces and Jacks through Kings, are not in equal proportions. There are more Aces than Kings, which have more than Queens, etc. resulting in about twice as many Aces as Jacks. This is important to know if you are going to use the shards mechanic for anything.
As I used that mechanic for determining which model would act next, I had to assign a card to each model. That allowed me to prioritize which models acted more often. In the scenario I had the following forces on the programmed side:
- Rifle Leader
- Rifle Sniper
- Rifle Soldier (x2)
- Line Leader
- Line Brawler
- Line Soldier (x5)
I think there are several ways to resolve that question, one of which is to randomize it. You could draw a card and if the die roll is 1-2 make it an Ace, 3 a King, 4 a Queen. and 5-6 a Jack if you want to focus on the extremes. If you want to focus more on moderate values you could choose 1 is an Ace, 2-3 a King, 4-5 a Queen, and 6 a Jack. Really the choice is yours on what you want to do; this is a toolkit. I thought it was important to point out that the probabilities are not equal.
Also, I also decided to go with a square grid instead of freeform movement because, well, that's my thing. I decided that I would allow one diagonal for every six squares, or fraction thereof. So a normal infantry move (6") gets one diagonal when counting squares, otherwise you must count horizontally or vertically only.
Another change is that I decided to try the 'flintlock option', where models armed with muskets and carbines require 2 action points (AP) to fire and rifles will require 3 AP. This will slow down the action, but that is okay. It allows for more movement and close combat, but de-emphasizes rapid fire. This is more a factor about OHSW and has nothing to do with HTAI.
Setup
I decided to randomize the terrain placement. Last time I noticed that I placed trees in 'bands' rather than randomly. This time I started by dividing the board into quadrants, rolled a die for each tree and rise and placed them in the appropriate section. I then divided each quadrant into smaller quadrants (sexdecrants?) and rolled again. At that point I simply placed them within the appropriate sub-section, aligning the terrain piece with the square grid.
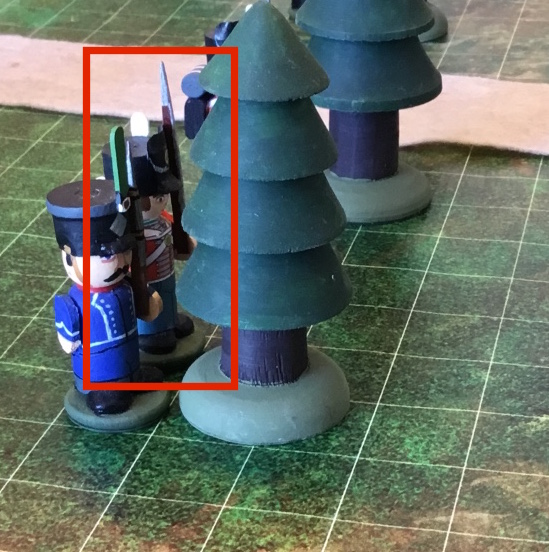
As before, the British (defenders) setup first. They had the bottom half of the board. I did not want to randomize placement of the British forces, as I thought that would make them too ineffective. Additionally, they were supposed to be in defense of the cannon. So, I generally placed them around the cannon, but within cover, as much as possible. The Line troops were mainly to defend the cannon while the Rifles were to sit back and pick off French attackers, as shown in the image below.

The French (attackers) have the top quarter of the board. One change from last scenario was to scatter the cavalry across the board, rather than cluster them into a unit. This would allow for more opportunities to spring forward and take out any aggressive British who had advanced too far forward.

As I indicated at the start of the post because of the probability of drawing Aces over Jacks, assigning cards to models was one way of determining how aggressively a model would be used. I decided to assign the secondary leader (the Line Sergeant) to a King of Spades and the primary leader (the Rifle Sergeant) to a Queen of Spades. The Line would be more active in their defense so they were Aces and Kings (the Ace of Spades being the Brawler) and the Rifles would be all Queens. As you will see, this has an impact on how frequently Line models act compared to Rifles.

In the image above 'S' stands for Spades, 'H' for Hearts, and so on for the suit of the cards. The value of the card – Aces, Kings, and Queens – is shown below the suit. Note that no models are assigned as Jacks, so when these cards were turned for model selection they were ignored and another drawn.
Note, in the commentary below, items in italics indicates text from the HTAI cards or rules. Initially I showed the text on the card, as a means of identifying where it is found, but after a while stopped (I am sure you got the concept by then). As a reminder, here is what an HTAI card looks like.

At the top, in the blue band, is the Reaction order on the left and the shard/card designation on the right.
In the middle (white) section are the main orders. The Patrol order is for when the programmed model is unaware of the enemy while the Attack order is for when it is aware. The text is the actual order. Although there is ample space to include the entire order, only part of it is listed on the card so you must lookup the keyword in the rules to find the full order. In this example Pace is the keyword for the Patrol order and Hostile is the keyword for the Attack order.
The bottom (black) section has three pieces of information: the compass, an enemy selection descriptor, and two movement dice.
The compass is largely used for order that indicate direction and not an enemy, such as the Flank order. The enemy selection descriptor, in this example the keyword Furthest, indicates the enemy model in relation to the model being ordered. Some descriptors are distance-oriented while others are status-oriented. In this play through I will allow any asterisk in the compass to apply to the enemy selection descriptor also.
Finally the movement dice indicate how aggressive a move will be. If 1D6 is indicated, the red die is used. If 2D6 is indicated, then both dice are added together. A sum of 7 or more indicates a foot model will take two Move actions. A sum of 10 or more indicates a mounted model will take two Move actions. If using 2D6 and either die is a '6', the model will take an additional Move action.
Turn 1
British won initiative and drew 11 AP.Drew the Ace of Clubs, so that identified the Soldier to act.


Another card was drawn to determine the action.

The card indicated under the Attack section that it was to be a Defensive order, moving 1D6 towards the player. The rule for Defensive says the model moves towards the player and then attacks. The model attempts to stay in cover (that is the defensive part). As I was not using the movement indicator (1D6 or 2D6) to determine the actual movement distance, but rather the number of Move actions it will take, 1D6 would always result in a single Move action, so no card was drawn. The Solider moved then fired as shown in the image below. (No card was drawn for determining the target as only one enemy model was in range.)

A Joker was drawn during combat resolution, ending the turn. Here is the situation at the end of the turn.

The early turn end meant the French were now under time pressure as they effectively had only four turns to accomplish their mission. Also note that due to discussions with the author of OHSW, I found out that Jokers are ignored during the End-of-Turn activities (casualty resolution and morale check) and the deck is not re-shuffled between turns, so there are fewer Jokers going into subsequent turns, generally making them longer.
Both sides passed morale and there were no casualties to resolve.
Turn 2
French won initiative and drew 12 AP.One of the French Soldiers moved twice and fired at the British Soldier in the open, but missed. The French Cavalry then moved twice and charged the same Soldier, killing him in close combat. From that position he snaped off a shot and downed the British Soldier behind the cannon.


Note that I am not trying not to go into much depth for the French as this is more about TSIA than OHSW.British drew 12 AP.
Amazingly, the British drew the Ace of Clubs again, resulting in the same Soldier acting as in the previous turn. This time, however, his order was Hostile: 2D6 towards player. So a draw of another card revealed the move was '9', so it was two Move actions. Drawing another card for direction it was towards the closest enemy.


The British 'berserker' charged forward two Moves (12 squares) toward the French Soldier and fired from behind a tree, downing his target. That is certainly a move I would not have taken!

The King of Hearts was drawn next, indicating it was the Soldier by the Rifle, directly in front of the charging French Cavalryman.

His order was React: *, meaning another card was drawn to determine the Reaction order. Reaction orders tend to be 'stronger' or 'special'. In this case I drew the Rally reaction.


The rules for a Rally reaction are to recover or help fallen comrade within 2D6. As we saw in the first test game of OHSW, downed models are very suspectible to being charged and automatically eliminated in combat. As the downed Soldier by the cannon was within two Move actions (I drew another card for movement distance and it was a '9', indicating two Moves), I decided that this Soldier would bravely positions himself by the downed Soldier. He then fired on the French Cavalryman, missing.

French won initiative and drew 4 AP.
The French Cavalryman charged the British Rifle and cut him down in close combat.

British drew 4 AP.
The British drew an Ace of Diamonds for model selection. Unfortunately that is the Soldier down by the cannon. It took several more draws, but I eventually got the Ace of Hearts, which was the Soldier standing on the left side of the cannon. His order was Defensive: 1D6 towards Objective. As he was at the objective (the cannon) that meant no move was necessary. He was also in cover, which Defensive requires the model to seek. There were two enemies within range to fire at, so I drew a card to determine the target and got Furthest.


As an aside, I like using the card for this. Getting Closest meant he would have been tracking the movement of the Cavalryman, while Furthest would have meant he was letting those to his right handle the Cavalryman, who was now past his periphery, leaving him to track the Soldier that moved up into cover and fired. Leaving these decisions to the system takes any bias out of your hands and puts it into the cards.Note, however, that the compass (also a part of the directional indicator) contained an asterisk, so a Reaction order had to be taken first. And of course it was a Charge!, which meant the model had to attempt to move into close combat, if possible, otherwise it would fire. As the model was not within close combat range (12 squares, as that was as far as the model could move given the number of AP that was drawn), it simply fired on the original target; the instinct to charge was ignored. (Tell me how you might have interpreted it.) Even though the French soldier was behind solid cover, he was downed by the shot.
With only 2 AP remaining I drew another card to see which model would act. I drew the Ace of Spades and got the Portuguese Brawler. Given that only 2 AP remained, the model could either move once or fire, but not both. The order drawn was Hostile: 2D6 towards Objective, so it was clear that I had to take the Move action.

On reviewing this it appears that I had one more AP remaining, so I should have drawn for another model to act. Oh well.French won initiative and drew 9 AP.
I had sort of gone on a 'Knight's Gambit' with my Cavalryman. I decided to continue pushing it as one possible path was to take two Move actions to the Soldier guarding the cannon, kill him in close combat, and a third Move to the downed Soldier, automatically killing that model, for a total of 9 AP. If I could take out those two Soldiers it would put the French way ahead in terms of morale.
The first charge, however, resulted in the death of the French Cavalryman. That feisty Soldier with the Rally reaction that went to cover his downed comrade was determined! So much for my plans.
As the Portuguese Brawler had advanced a little it just put him in range of the French Sergeant's musket. The Sergeant fired and downed the Portuguese Soldier.
Another French soldier fired at the 'berserker' British Soldier and, despite having a shot against cover, downed him also.
The final French AP was spent advancing a French Soldier towards the cannon.

As a note, there were at that point two British casualties and three downed, while the French had one casualty and two downed.
British drew 9 AP. (What is it with these duplicate AP draws against two decks!?!)
Drawing the King of Spades the British Line Sergeant finally got to act. His orders were to Flank: 2D6, which the rules say you draw to determine a general direction, heading for cover in that direction. The direction drawn was NW, so to the model's left and towards the enemy. It drew a '9', so two Move actions. An idea I had been toying with is that for if a '6' is drawn on either die, it would indicate a third Move action. In this case it had one, so this model would consume all of the AP moving to that flank position.

French won initiative and drew 8 AP.
The forward French Soldier moved into cover and fired at the British Soldier by the cannon but missed. Another Soldier advanced and took a shot at the Sergeant, also missing. Meanwhile, on the French left flank the French Soldier and the Cavalryman advanced up the flank.

British drew 10 AP.
The British Line Sergeant again got to act, He drew the order Hostile: 2D6 towards Objective. The movement draw was '8', so it was for two Move actions. One thing to note is that there were no enemy at the objective, but there was one near.

So I interpreted the order as indicating the Sergeant would attack the French Soldier after moving twice. He attacked with the bayonet and won. He could still take a Fire action so I drew a card to determine which of the French models it would attack and it came up Closest, but with an asterisk, so I needed to determine the Reaction order. I drew Double Time, which read enemy takes two Moves in a row. Now I do not like solo systems to be able to 'break the rules', allowing a model to act twice in an Action Phase such as Move-Fire then Move again would do. So I determined that, because a model can take three Move actions in a phase, that meant the Sergeant would take a third Move action, rather than a Fire action. (After moving three times there are not enough AP to fire.)
After much card flipping I finally got the Queen of Spades, the Rifle Sergeant, who drew the order Defensive: 1D6 towards Objective, with a Reaction order of Secondary. Secondary means that the model uses any secondary weapons or gear that they possess. In that context it meant nothing (the model had no secondary weapon or gear), so it was ignored. The final result was that he moved out of cover towards the cannon for one Move action.

French won initiative and drew 7 AP.
The French Sergeant fired at the British Line Sergeant, barely downing him. The French Soldier nearby moved up and bayonets the Sergeant, then moved again and bayonets the other British Soldier. Those losses really hurt the British.
Finally, another French Soldier advanced forward to put pressure on the British holding the cannon.

Both player's decks were down to less than 1/2 of their cards, yet still no Joker had appeared, making for a very long turn. The British had lost four models, one being a Leader, and had two downed. The French had lost two models, one being a Cavalryman, and had two models downed.
British won initiative (finally) and drew 12 AP.
A Rifleman on the left-center got to act, drawing the order Retreat: 2D6 (move '3', so only one Move action) towards cover. Note that a Retreat does not have you attack at the end, so this is simply a move. Wow, I guess the French pushing forward and having witnessed the bayoneting of two British took its toll on his nerves! (I did not expect that!)
After a lot of flipping to find a card for someone not dead or downed the Soldier to the left at the cannon got a Flank: 2D6 order. The move indicated three Move actions (because a '6' was in the move dice), direction of East! I guess he saw the threat to his right. He fired at the Weakest enemy, which would be the Cavalryman (as he only gets one card of cover from the rise while the Soldier would get two). A Joker was drawn and the turn ended.

The first thing is a Morale Check. The British have a Motivation of +3 (defined by the scenario) and had four casualties. A 2+ will succeed and they drew a 2! (Cutting it close.) The French have a Motivation of +2 and had two casualties. Any card would suffice, and they passed easily.
When I drew for Casualty Resolution (Red is Dead and Black is Back), both the British Soldier and the Portuguese Brawler were eliminated. For the French it turned out that both of their soldiers were also dead.
At that point the British had lost six models and had five remaining. The deck is a sliver, but one Joker had still not been revealed, so next turn was likely to be a very short turn. The French had lost four models and had 12 remaining. Their deck was also a sliver, but it had shown both Jokers (the second was drawn during Casualty Resolution).
As it takes a long time to document a game, I am going to leave it off at this point as the review is about HTAI, not OHSW, and I have a good enough feel to complete the review. (Oh, all right, the French won as the British failed their morale check on turn 4.)
Initial Thoughts
First, let's be clear, there is no "artificial intelligence" embedded into this product. It is just a marketing thing and no one really expects that it would actually have 'intelligence', right? In order for it to have intelligence, there has to be some input from the game upon which the system processes.
So now that we got that out of the way, what exactly does the product do? Well, it provides structure to make decisions randomly. Every non-computer-based solo system I have encountered either was simply a random roll to choose from several interesting options or was programmed (i.e. when event X occurred then action Y would be triggered). The former was much more flexible in that it could be used in a variety of situations, whereas the latter was a richer experience but because of its strict inputs was inflexible. (If you have experience with something that has neither of these restrictions, let me know.) HTAI does pretty well in providing interesting orders for your non-player troops.
So now that we got that out of the way, what exactly does the product do? Well, it provides structure to make decisions randomly. Every non-computer-based solo system I have encountered either was simply a random roll to choose from several interesting options or was programmed (i.e. when event X occurred then action Y would be triggered). The former was much more flexible in that it could be used in a variety of situations, whereas the latter was a richer experience but because of its strict inputs was inflexible. (If you have experience with something that has neither of these restrictions, let me know.) HTAI does pretty well in providing interesting orders for your non-player troops.
Rules Ratings
Using the review system from before, here are the game ratings for Hostile: Tactical A.I. (HTAI).Drama – do the rules create tension during play?
Because we are dealing with just what HTAI adds to rules, I would say that sometimes HTAI makes unexpected moves. For the most part, however, they are not necessarily good moves, just unexpected. It sometimes throws the player off balance, which leads to some drama, but mostly just distracts the player from the mission.
These rules rate 2 out of 5 in Drama.
Uncertainty – are there enough elements that introduce uncertainty into the game?
Because HTAI is, at the heart of it, a way of structuring random elements, it is all about uncertainty. As I said previously, the two core questions a good solo system must answer are: which model acts next, and what will the model do when it is time to act. HTAI answers those questions very clearly. As the rule set I was using is very much oriented towards reacting to your opponent's move while trying to fulfill your mission, this same scenario can play out an untold number of ways using HTAI.
Engaging – do the rules allow the player to make meaningful decisions that lead to consequences?
The whole point of this product is to take as many of the decisions for the programmed side away from the player as possible, so in this case a low score is probably better, not worse, but that is confusing so I will call this rating Lack of Administration. There were times when I had to interpret what the card meant or whether it should simply be ignored because it did not apply in the current context, so some administration is required.
These rules rate 4 out of 5 in Lack of Administration.
Unobtrusiveness – do the rules get in the way?
No, unless you use HTAI more strictly than I do. For example, I could have used the movement dice to indicate how many inches or squares the model moved, not just how many Move actions they took. Had I done that then some models would have fallen short of cover because they rolled low. Also, I did not allow the programmed models to 'cheat' by breaking the core rules. (Maybe this is necessary as the random selection will never be as smart as you, so the game needs to cheat in order to provide you with a greater challenge. Many video games do this, or are accused of doing this.)
The most obtrusive part is the rules for the keywords and model selection (due to card assignments).
These rules rate 3 out of 5 in Unobtrusiveness.
Heads Up – are the rules playable without frequent reference to a quick reference sheet?
Maybe as you use HTAI more the keywords become second nature, so referring to the rules cards doesn't become necessary. But for me I often double-checked the rules card to ensure I could attack after a move, or whether I was supposed to seek cover or not. Ironically, the rule could easily have been printed in full in the Orders section of the card, so it was not really necessary creating a separate, referenced rule.
Again, the second major hassle was looking up a card and figuring out which model was to act. Unless you use card markers or have some other form of identifier on your models and you create a lookup table, this will be the most tedious part of the game. Because model selection is key to answering one of the two critical questions that a solo system has to answer, I cannot ignore this aspect of HTAI.
These rules rate 3 out of 5 in Heads Up.
Appropriately Flavored – do the rules 'feel' like they represent the period or genre being played?
HTAI is not intended to represent any period or genre, nor is it supposed to add flavor.
These rules are not rated in Appropriately Flavored.
Scalable – can the rules be scaled up or down – in terms of figures or number of units played – from a 'normal' game?
Here, I am changing the definition of the rating a bit. I want to address whether HTAI can be used for larger unit sizes or not. Currently, HTAI is intended to represent the orders in a skirmish game where each unit is a single model. Could it be used to represent the orders of a squad? A company? A battalion? etc.
The farther you move away from the core use – a single figure or model – the more 'interpretation' you are going to have to do with the key words on the card. How does a battalion's actions differ when Defensive: 1D6 move into cover is drawn as opposed to Hostile: 1D6, especially when there is no cover nearby? What if there is cover, but moving into it would disorder the unit? I could easily see where a 'positive' order for a skirmish-level game might act as a 'negative' order for massed combat.
In terms of scaling for using more figures or models, the key limiting factor is that there are only 16 card assignments for determining which model acts next. You would have to group models in order to fit into 16 slots and then draw another card to determine which model in the group would act. At that point it would simply be easier to develop your own system for model selection. Also, if you do not like the differing probabilities of cards appearing you would need to develop your own system.
Given the amount of interpretation that would be required to accommodate other scales, I would have to rate it low.
These rules rate 2 out of 5 in Scalable.
Lacks Fiddly Geometry – do the rules require fiddly measurements or angles?
HTAI adds no elements of measurement or line of sight, etc.
These rules are not rated in Fiddly Geometry.
Tournament Tight™ Rules – are the rules clear and comprehensive, or do the players need to 'fill in the blanks'?
The whole point of HTAI is to game solo, so these would never be used in a tournament. More to the point, rules disagreements largely don't occur if you are playing solo. Nonetheless, what this rating really refers to is ambiguity in the rules. How much do you have to interpret? Actually, a lot less than I expected, but obviously, for a product that is supposed to cover 'any' skirmish scenario it is going to have to have some interpretation left up to the player.
These rules rate 3 out of 5 in Tournament Tight™ Rules.
Solo Suitability – do the rules have elements conducive to solo play?
There are no hidden elements to the game so that alone usually grants the rules high solitaire suitability. Having a mechanism to randomize how a model acts is usually an element that solo gamers inject into other rules, sometimes with disastrous results, so having that mechanism built in and accounted for is just icing on the cake. Because it also has a mechanism for determining which model acts next, it is given a perfect rating.
These rules rate 5 out of 5 in Solo Suitability.
Component Quality – are the components provided made with quality?
This is a new rating, meant primarily for board games and books, which addresses the quality of the physical components.
First, there are three options when ordering this product: have the cards and rules printed; have the cards and rules printed and receive a PDF of the cards and rules; or receive a PDF of the cards and rules. I went with the first so really most of this rating is about the quality of the cards from War-game Vault.
The cards are nice and glossy, but a little thin. Thin cards seem to 'clump' together when shuffling and they usually do not spring back to shape as quickly.
There are several misspellings in the text of the cards and rules, indicating it needs a better editor. (Like my blog.)
These rules rate 3 out of 5 in Component Quality.
Summary
I can't say it enough, but solo systems are not fully fleshed out unless they answer two questions: which model acts next and what do they do when it is their time to act. HTAI does a really good job of that, but there are some ideas that you have to accept, one of which is that some figures will have a higher probability of acting than others. Because that math is burned into the cards, you really cannot change that idea easily. Maybe that is why getting the PDF is such a good idea. With some editing software it would be relatively easy to make the probability of card selection equal or allow for more models than just 16. But, you would have to print the cards out yourself.Would I use these cards again? Yes. Would I use them to play solo with other unit scales? Probably not, but I would likely take the ideas and build upon them.
Recommended.
