Tuesday, June 14, 2022

Ambush on the Forest Road

This game comes from my map campaign. If you want to see how I generated the terrain, scenario, and various twists to the game, read my blog post about it.

The Scenario

As indicated in the other blog post, this battle will be fought out using Neil Thomas' One-Hour Wargames (OHW) rules, which the basic scenario also comes from (a combination of scenario #6 Flank Attack (1) and scenario #13 Escape). As with the last two battles, I have added some twists to the game by using the Kings of War Battlefield Cards and the Warcry Battleplan Cards.

In a nutshell, the Westonians (red) will be marching on the board, starting in C1. Because the force consists of Infantry, Artillery, and Cavalry all units are confined to the road if there are woods (light or dark green ovals) in the square. Their battleplan is to exploit the gaps in the woods (C1, C3, C6, and D1) to deploy troops and destroy the Eastonians.

The Eastonians have set up an ambush, however their forces consist solely of Hussars (skirmishing light cavalry). They can move through any square save the heavy woods (dark green ovals). Their battleplan is to ignore the minor victory objective (moving troops off of the board to the West) and fight as hard as possible in inflicting damage on the ambushed Westonian troops.

Scenario Special Rules

There are a number of special rules for this scenario.

Artillery, Infantry and Cavalry on roads may move through woods squares, but because they cannot deploy into that terrain, they are limited in what they can while in those squares.

  • Infantry may only fire from squares that are clear of woods terrain (light or heavy).
  • Cavalry may only charge from squares clear of terrain if the target of the charge is also in clear terrain, and all squares moved through are clear terrain.
  • Artillery may fire from clear terrain to any other square as long as they have line of sight from the center of their square to the center of the target square. Artillery may always fire on an adjacent square that they are facing, even if they are on a road going through the woods.

The Westonians drew a useful Stratagem to use called Sudden Faith. It allows them to modify a die roll by 1 for an activation test (see Rules Changes below) for one unit, once. The Westonian player does not need to state before the die roll whether they will be using the stratagem, they simply declare when it will be used.

The twist to this scenario is that because the Westonians are largely trapped on a road moving through the woods, save for occasional clear areas, they will fight with Battle Frenzy, which in turn cause the Eastonians to fight with the same vigor and effectiveness. The effects of Battle Frenzy are as follows:

  • Cavalry charging units in the open do so using the procedure indicated in the main rules.
  • Infantry may charge the enemy in the open or light woods, but do so inflicting 1D6-2 hits. If the enemy unit are Skirmishers or Hussars, they will retreat one square to their rear, otherwise the attacking Infantry must retreat if they did not destroy the enemy unit. If the enemy retreats or is destroyed, the Infantry take the square.
  • Cavalry may not charge the enemy in light or heavy woods.
  • Skirmishers may charge the enemy in any terrain other than impassable terrain. Hussars may charge the enemy in any terrain other than impassable or heavy woods terrain. Both unit types inflict 1D6-2 hits, but must retreat if they did not destroy the enemy unit.
  • Skirmishers and Hussars do not get half casualties in close combat, although Cavalry continues to get that benefit.

One-Hour Wargames Rule Changes

Generally speaking I don't like changing rules, but frequently do it, as it makes battle reports harder to understand by people that know the rules but do not know your changes, so I will list them out here, largely because I am doing some experimentation with these changes.

  • As with all of my OHW games I play on a board marked out with a 6" square grid (six rows by six columns). Each unit is contained within a  single square and each square contains only one unit. One day I will publish my grid rules, but for now just know that all measurements in OHW are converted to squares.
  • Skirmishers fire at 1D6-2, as normal, but their fire negates any cover bonus (half casualties).
  • Skirmishers receive half casualties, regardless of terrain, when fired upon by Infantry and Artillery.
  • Skirmishers receive double casualties in close combat with Cavalry.
  • Hussars are a new unit type that move 15", fire 1D6-2 out to 12", can interpenetrate and be interpenetrated by friendly units, receive half casualties from Infantry and Artillery fire, and can enter close combat with Skirmishers, Artillery, and Hussar inflicting 1D6-2 hits. Like Cavalry in close combat, unless they eliminate the unit they must retreat from close combat each turn.
  • OHW uses the concept of a standardized unit that is eliminated after having received 15 hits. I have reversed this concept in assigning a number of 'health' to a unit, indicating the number of hits it can take. Rather than adding hits to a unit from shooting or close combat, the hits are removed. This allows me to have non-standard units with more or less health than the standard 15, while still maintaining 15 as the standard for other rules, such as casualty recovery.
  • In OHW all units automatically act with full effectiveness, right up until the point they are eliminated. I am going to experiment with an activation roll of 1D10 each turn for each unit. If they roll less than or equal to their remaining health they can act as normal; if they roll greater they may not act at all that turn. This effectively allows a standard unit to act fully as long as they have not lost more than ⅓ effectiveness; after that they may falter in their actions.
  • When units are on a road in terrain they cannot normally move in, e.g. Infantry and Cavalry in woods, they are considered in 'march column'. Units firing or in close combat against units in march column get a bonus in combat: 1D6-2 becomes 1D6; 1D6 becomes 1D6+2; and 1D6+2 becomes 1D6x2.

The Battle

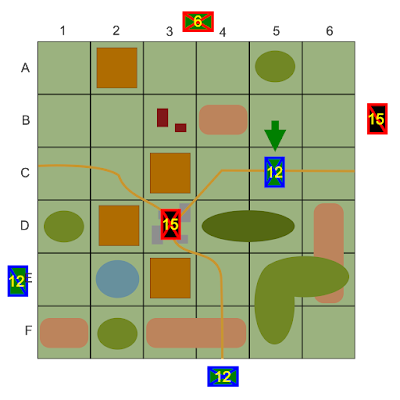
The battle will start with the Westonians (red) entering the board in C1. They will move 9" (1 ½ squares) down the road each turn until they move off the board via the road exit.

Turn 1

The first turn is rather uneventful, as you might imagine. As a note, when a unit moves in other than increments of 6" (the size of our squares) I usually mark them to show that they have additional movement that can carry over to the next turn. For example, the Red Infantry moving down the road has 9" or 1 ½ squares of movement. On the first turn they move 6" (one square) and gain a movement marker (green circle in the front-left corner) indicating that if they have 9" of movement next turn, they will me able to move 12" (9" + the previous 3") or two squares the next turn, at which time the marker will be removed.

The Blue Hussars, because they have a 15" movement, also receive a movement marker.

Turn 2

Red troops continue to pile on while the Blue Hussars fires at the enemy, inflicting a heavy blow to their morale.

At this point it might be helpful to calculate the Average Turns to Eliminate or ATE of each side. I use this score to help me understand which action is the best to take. It helps me remove bias from my game play decisions.

At this point the Red Infantry is in a clear terrain square so it is deployed into line formation and can fire fully (1D6). However, the Blue Hussars are in cover, so casualties are halved. That allows Red to inflict about 2 hits per turn, so their ATE for the Blue Hussars is 9 (turns). If they charge into close combat they switch to 1D6-2 (ATE 18), so there is less reason to charge if the goal is to inflict maximum damage. However, Infantry force Hussars to retreat if charged, so this is a viable option.

When the Blue Hussars are firing 1D6-2, they inflict about 1.67 hits per turn so the ATE for the Red Infantry is also 9 turns. If the blue Hussars charge into close combat their dice is still 1D6-2, so there is no change. Unlike the charge of the Red Infantry, however, the Blue Hussars do not force back their enemy.
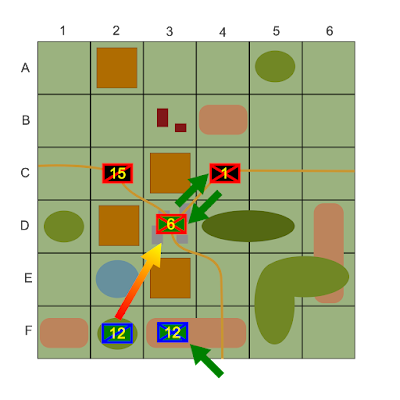
Turn 3

The Red Infantry has a choice: 1) stand and fire at the Blue Hussars (ATE 9), who also have an ATE of 9; or 2)  charges the Blue Hussars in order to drive them back, while inflicting minor damage (ATE 18). Applying a 50% chance to each option Red chooses to drive Blue down the road.

The Red Infantry scores no hits, but pushed the Blue Hussars down the road (to C5). This must have been a planned feigned retreat because when the Red Infantry hits the woods (C4), the Blue Hussars counter-attacked. With the Red Infantry unable to deploy effectively (they count as in march column), the Blue Hussars inflict a heavy hit on the bunched up enemy.


Solo Gamer's Notes: I actually played this out twice. The first time I had the Red Infantry stand and fire in C3 and they were eventually eliminated. At some point (turn 7?) I struck upon the option of charging to push the Blue Hussars off of the board and wondered if I should have tried that option. As I had forgotten to apply the Activation Rule, and that was the whole point of playing these experimental games, I decided to rewind back to this turn and dice to see which way Red would go.

Turn 4

With the Red Infantry at 5 hits they now have to roll to see if they activate. They roll a '10', so they do not! The Blue Hussars continue to fire away at the Red Infantry, whittling them down further. Meanwhile the column of Red forces have come to a halt.

Turn 5

That was a disastrous turn for Red and unless the vanguard is exceedingly lucky, the unit is going to fall. The second Red Infantry should have enough elan to push the Blue Hussars back a turn or two, but then what? Until the Blue Hussars are whittled down below 10 health remaining, they will likely continue to act each turn. Although this is an experiment, I don't want it to be at the expense of the entire Westonian Southern Army. (Or do I secretly have an Eastonian bias…)

The vanguard of the Red Infantry continues to wallow in confusion and the Blue Hussars sees to their destruction. The Red Artillery moves off of the road to make way for more Red Infantry, should they be needed to carry the position the Blue Hussars are defending.

Solo Gamer's Notes: The Blue Hussars had a choice of either standing and firing or charging into close combat. The number of hits inflicted is the same in both instances, but close combat would have resulted in taking position C4. Had they charged, the Red Infantry in C3, which is in clear terrain and thus deployed, would have been able to fire with 1D6x½. As they stood and fired, Red Infantry must advance next turn, giving the Blue Hussars first fire.

Turn 6 and 7

Continuing with their strategy, Red is pushing forward with the point of the bayonet. The carnage in the woods is horrendous, however, as the Blue Hussars continue to exact a toll on the confused and densely-pack Infantry.

The Red Infantry continue to roll low – not having scored a single hit on the Blue Hussars all game – but they continue to push them back, but at great cost.


Solo Gamer's Notes: At this point I need to make a decision. Do I allow the Red Infantry to push the Blue Hussars off of the board and end the game or do I allow them to stand? This was one of the 'gotchas' that came up with this rule in my AWI variant of OHW, which has this same 'defender retreats' mechanic. Another possibility is to extend the battlefield by creating column 7. This is one of the possibilities you can do with solo gaming, especially if you have the space. As the first two options are not especially realistic – there is no magic line in the ground that instantly stops combat or gives a unit the courage to stop retreating – so I decide to extend the battlefield, rolling for terrain. If the terrain generation is generous enough – like it was in E3, E4, and F4 – it might open up at the road allowing Red to overwhelm Blue.

Turn 8

After generating more terrain – and the results were not kind to Red – I continue with the combat.

The Red Infantry again push the Blue Hussars back, but still inflicting no hits. (How many '1's and '2's are they going to roll?) Because they hit an open area, the Red Infantry can deploy into Line, so they do not get hit with 1D6 by the Blue Hussars.


Solo Gamer's Notes: At this point I feel a twinge of "Are you sure this is the right tactic for Red?" When Red deploys, the casualty rate against it goes down and the casualty rate against Blue goes up. Given that pushing Blue 'off board' does not result in a victory, only in the board being extended, pushing no longer seems like an effective tactic. So, either Red takes a stand here or … if Red can push Blue back one more square to C8, this would allow Red Infantry to move to C7 and eventually B7, while the next Red Infantry would move up to either C6 (to let Blue move back to C7 to be caught in a crossfire) or to C7 (to switch out to a fresh Red Infantry unit). I decide to keep the current 'push' tactic on a 1-2, with push to B7 on a 3-4, and stand and fight on a 5-6. Apparently the lead unit is tired of taking hits, so they want to stand and fight.

Turns 9 Through 15

A cheer goes up from the Red Infantry as they finally score some damage against the Blue Hussars, but it is quickly quelled as the return fire is devastating (1 hit versus 4 in return). The Red Infantry courageously continues to stand and deliver. Unfortunately, it was not enough. Red Infantry's morale collapsed and they could not longer effectively muster the courage to charge or to fire. The Blue Hussars whittled them down but failed to eliminate them when darkness feel. Both sides retreated to regroup.

Wow, was that battle different! Again, the goal of my campaign is to generate scenarios with context to the both the last and next game, create scenarios that are not plastic, even point battles, and create situations that you might not normally play with a face-to-face opponent (such as a 7 units versus 1 unit full-on ambush). So far I feel like I have succeeded, in only for blowing dust off of products that I purchased and have never used (I am looking at you The Solo Wargaming Guide, Kings of War Battlefield Cards, and Warcry Battleplan Cards.)

For those of you who are fans of OHW, I would like to hear from you about what you think of these modifications. Half casualties for Hussars (and Skirmishers) did not have a huge effect because so many attacks were close combat and 1D6-2. When they finally turned to firing, they kept rolling a '1' and then they failed activation.

What did have an impact were the activation rules. Once a unit gets below a certain number of hits it is doomed, save for the occasional bit of luck. The reason why this rule had such an impact though is due to the nature of the terrain and unit characteristics. If there had been room to maneuver, or the unit could have been interpenetrated, their inability to activate would have been much less of a consequence.

For those here for the solo mechanics talk, I know I have moved away from programmed A.I. type rules and towards using chance to determine a course of action amongst two or three (or more) logical choices. From a gaming viewpoint, this method is more flexible than programming, but it allows more player bias to creep in. Then again, sometimes the path that you think is the 'best' turns out not to be, or allows you to explore other concepts like an expanding tabletop. I would like to hear what you think about these concepts also.

Thursday, May 26, 2022

The Second Battle for Firnskuppe

Introduction

This is the tactical battle for my second engagement in my solo campaign, the First Elopean War. I am again using Neil Thomas' One-Hour Wargames (OHW) to fight out the tactical battles. The only difference from the normal rules in that I used a 6" square grid for regulating distance. For the campaign, I am using The Solo Wargaming Guide (TSWG).

In the first battle the Westonian Advanced Guard, consisting of a Line Infantry Regiment and a Line Cavalry Regiment, attacking the barely mustered Firnskuppe Hussars, an understrength Light Cavalry Regiment. The Eastonians were driven from the town, leaving the Westonians in possession, waiting for the main forces to arrive.

The second engagement sees more Eastonian forces arriving, attempting to retake the town.

Pre-Battle

I have decided to try another system for determining what the battle's setup, victory conditions, and "game twists"; this time Games Workshops' Warcry. Why Warcry? It is a currently available game and thus its components are readily available. I am not suggesting you buy the rules or a boxed set, but you can buy the Warcry Battleplan Cards (WBC) separately. Like the Kings of War: Battlefield Cards, they use cards to provide you variations in your games. The WBC contains four sets of cards: the Terrain Deck; the Deployment Deck; the Victory Deck; and the Twist Deck.

The Terrain Deck dictates the terrain that will appear on the board. As Warcry is a skirmish game, this terrain is not really suited for the tactical level of game we are playing. Besides, we will be reusing the terrain from the first battle as this battle is also centered around the same area.

The Deployment Deck covers the deployment diagrams that are in TSWG (see image below), but offers far more variations.


The Victory Deck will serve as a replacement for the Objectives Deck from Kings of War. Again, as WBC is centered around game system, there may be a bit of interpretation to make it work.

Finally, the Twists Deck is akin to the Conditions Deck from Kings of War. It is to add a twist to the battle, hopefully without too much interpretation.

Deployment

I drew the card "Deadly Gambit" (see image below). The two sides are shown as red and blue and each force is separated into three battle groups: Hammer, Dagger, and Shield. Each battle group must contain at least one unit (if possible) and no more than one-half of the units. The Shield group must contain at least one-third of the units, rounded up.


This is a complicated deployment as red force has their Dagger battle group in the SW corner, but the remaining groups are coming on from the N and the NE. The blue force has their Dagger battle group in the NE corner, and the remaining groups coming on from the S and SW. So the Dagger forces are positioned near where the enemy will come on (hence a deadly gambit).

Given the locations of the forces on this card and their locations on the map I can envision the Westonian infantry patrolling close around the town of Firnskuppe, thus it makes sense that the are red Dagger. Because the red Shield must contain at least one-third of the forces (in this case, one unit), the cavalry is red Shield. It appears they were patrolling the woods outside of Firnskuppe and are coming back due to the town coming under attack.

The Eastonian forces are approaching Firnskuppe from the East and South. It makes sense (to me) that the light infantry from the East are in the blue Dagger group. They are skirmishers and they appear to have infiltrated onto the board before the alarm was raised. The light cavalry from the East have swung around the town and are attacking from the SW (Shield group). Finally, the light infantry from the South are entering as the blue Hammer group.

Note the markers RND2 on the card. This indicates that these forces will come on at the beginning of Round 2.

Victory Conditions

As always, the primary objective of each side is the destruction of the enemy forces, but as I indicated last time, I wanted to determine a 'victor' for the purposes of determining which side would have a higher casualty rate. (The loser would have that higher rate.)


As shown in the image above, the victory conditions indicate that the map is to be divided into quarters. Each quarter generates a victory point at the end of each round. The battle ends after three rounds.

The first interpretation is 'what is a round'? Warcry generally lasts four rounds, so this indicates it is a shorter game. OHW typically lasts 15 games turns, so it looks like a round is roughly equivalent to four OHW turns. So this battle will last no more than 12 turns.

Further, the Hammer and Shield groups are to enter on round 2, so they will come on at the start of turn 5.

Finally, because the Eastonian force coming from the South (blue Hammer group) marches two hexes to get to the battle (the East force only marches one hex), I am imposing an additional delay. Blue Hammer will enter on round 3, or the start of turn 9.

The Twist

As shown in the image below, I drew "Sinister Bargain". This needs a lot of interpretation, given that it talks about chaos and a beast.


It is relatively simple though. The town of Firnskuppe is being fought over. Although it is a very small town (class E) with no inherent militia, I am going to treat this as a band of armed citizenry. If the Eastonians win the roll-off, they are patriots; it the Westonians win, they are collaborators who have been waiting to switch sides. The band will count as an understrength (one company) Skirmisher unit.

Rather than using a simple roll-off, I will use each side's Commander Competency Rating (CCR), which happens to be a '3' for both sides. Westonia rolls a '4'; Eastonia rolls a '3'. The Skirmisher unit goes to the Westonians.

Deployment

As a reminder, here are the effects of the terrain found on this board.

Road - (light yellow-brown line) Units moving by road increase their movement distance by 3" if their entire move is spent on the road. This bonus may not be received if charging.

Lt Woods - (light green oval) Only Skirmishers may enter. Units receive ½ casualties from firing.

Hvy Woods - (dark green oval) Only infantry Skirmishers may enter. Units receive ½ casualties from firing.

Lake - (blue-gray oval) Impassable to all units.

Firnskuppe - (four gray rectangles) As this is a Village (class E) and not a Town (class D or better), movement is not affected for any unit. Units receive ½ casualties from firing.

Farm - (two dark red rectangles) Skirmishers receive ½ casualties from firing.

Fields - (large brown square) Cavalry movement is halved. (In terms of a square grid that means Cavalry may enter the Fields on its second square of movement, but only receives one square of movement when exiting the Fields square.)

Hill - (light brown rounded rectangle) Units in close combat defending a hill from an attacker not on a hill receives ½ casualties.

As you can see in the map above, B5 contains the Blue Dagger and D3 contains the Red Dagger. (Normally, Red Dagger would be at E2, but as that is a lake square, and thus impassable, I decided to roll a D10 for the location of the unit. 1, 2, and 3 would be D1, D2, and D3. 4 and 5 would be E1 while 6 and 7 would be E3. 8, 9, and 0 would be F1, F2, and F3. With the roll of a '3', the unit ended up in the village.)

Units with green backgrounds are Skirmisher units, while those with black backgrounds are either Infantry or Cavalry. The numbers in the center represent the number of remaining hits.

Battle Plan

One of the things ideas in TSWG is to make three battle plans and to simply roll a D6 to determine which one to run.

Blue

The first battle plan (roll of 1-2) is for the Blue Dagger to get to cover in the NW corner to take that objective, then hold off the enemy for as long as possible. Hammer and Shield will both enter the SW quadrant to contest that quarter.

Battle plan 2 (roll of 3-4) is for the Blue Dagger to get cover in the SE corner to take that objective, while staying out of line of sight. When Shield enters the board (on turn 5), both will simultaneously attack Firnskuppe.

The final battle plan (roll of 5-6) is for Blue Dagger to immediately attack Firnskuppe in order to whittle it down so Blue Shield can take it as soon as possible.

Red

Battle plan 1 is to defend Firnskuppe with all units, as they arrive.

Battle plan 2 is to defend Firnskuppe with the Red Infantry, attack with the Red Cavalry (the closest unit), and hold the NW corner with the Red Skirmisher.

Battle plan 3 is to defend Firnskuppe with the Red Infantry, hold the NE corner with the Red Cavalry, and hold the NW corner with the Red Skirmisher.

Result

Blue will use battle plan 3 while red uses battle plan 2.

The Battle

Turn 1

Blue

Blue Skirmishers move from B5 to C5. Although the unit could have moved into range and line of sight by moving to C4, this would have put the Skirmisher at a severe disadvantage (it takes full damage, while the attacker takes ½ damage).

Let's stop for a second and go over which square the unit should move to. First, you need to understand my concept of Average Turns to Eliminate (ATE). If you look at the possible number of hits a unit can inflict, the number of hits remaining in the unit being fired upon, you get the average number of turns to eliminate that unit. Quickly calculating this value can help you determine which target you should attack (your ATE against the enemy unit) and where you should move (the enemy's ATE against your unit).

The average hits by Skirmishers and Infantry are:

Die RollSkirmisherInfantry
101
202
313
424
535
646
Average1.673.5

So the ATE of Infantry being shot by the Skirmisher is 15 hits / 1.67 or 9 turns (rounded up). The ATE of Skirmishers being shot by Infantry is 12 hits / 3.5 or 4 turns. Note that shooting at units in cover changes the ATE.

Die RollSkirmisher vs CoverInfantry vs Cover
101
201
312
412
523
623
Average12

The ATE of Infantry in cover being shot by the Skirmisher is 15 hits / 1 or 15 turns, while the ATE of Skirmishers in cover being shot by Infantry is 12 hits / 2 or 6 turns. Because the Infantry will (likely) remain in Firnskuppe it will always be in cover, so it will have an ATE of 15. If the Skirmishers fight it out of cover its ATE will be 4, but will jump to 6 if it moves to cover first.

With the target in D3 you have to be in the following squares to be in cover while also being in line of sight of Firnskuppe: B3, D1, D4, and F2.

Now let's think about the Red Cavalry that will enter on turn 5. With close combat you can also calculate ATE.

Die RollCavalry x ½CavalryCavalry x 2
1236
2248
33510
43612
54714
64815
Average3.55.510.83

Given these stats, the Skirmisher simply cannot afford to get caught out by the Cavalry. Thus the only safe squares for the Skirmishers are: D1, D4, and F2. This is why the Blue Skirmisher moved from B5 to C5. It is heading for the heavy woods in D4. Had it moved to C4 the Red Infantry would shoot it in the open, inflicting 3.5 hits. By moving to C5 it can still reach D4 next turn, but without being shot upon in the open.

Red

With the Blue Skirmisher hiding and the Red Infantry with orders to hold Firnskuppe, it has no action this turn other than to face towards the East.

Turn 2

The Blue Skirmisher moves from C5 to D4. Now it is safe from the Red Cavalry that will come on and has cover against the Red Infantry. It will still be outshot by the enemy, but its mission is to wear down the enemy for other units to take out. Meanwhile the Red Infantry fires, scoring a measly one hit.

Turn 3 and 4

At this point neither unit is moving and both are firing, so I will play out two turns. After that reinforcements will come on for both sides.

With the end of the 'round', Red scores 1 VP for holding the SW quadrant while Blue scores 1 VP for holding the SE quadrant.

Turn 5

Time to bring on the reinforcements! Remember that the Blue Hammer (Skirmisher) does not come on until turn 9, as it has farther to march to get to the battle. But the Blue Shield (mounted Skirmisher) can come on, as can both the Red Hammer and Red Shield.

So, let me explain the logic behind the moves. Blue Mounted Skirmisher is not Cavalry, so it cannot charge. It is essentially a fast moving Skirmisher unit that cannot enter heavy woods. So, like the Blue Skirmisher it needs to attack by firing and it wants to stay in cover. It has two basic missions: eliminate the Red Infantry in Firnskuppe and contest the SW quadrant. It can do this from either D1 or F2. Although the Red Cavalry cannot attack it in either square (Cavalry cannot enter light or heavy woods), the Red Skirmisher coming on can. So by choosing to move to F2, Blue can continue to attack Firnskuppe, but it makes it much harder for Red to disrupt that attack.

The Red Skirmisher is heading for the farm (B3) as it is cover and it allows it to control the NW quadrant, but it wants to ensure it gets there safely. Although no one is likely to attack it, moving behind the hill in B4 ensures that.

Red Cavalry is to attack any Blue unit brave enough to come out in the open, or to move into Firnskuppe if it becomes undefended. It cannot attack either Skirmisher unit as it cannot enter the woods squares, so it really has no target. At this point you have to ask yourself whether you feel it is legitimate to change plans or not, i.e. switch to contesting either the SE quadrant or holding the NE quadrant, rather than hunting for units to charge.

You might think it is rather disadvantageous for Red with all this woods, but remember that Firnskuppe is actually in a woods terrain hex on the main map. So if anything, this table is rather clear considering its surroundings.

Turn 6

The Blue forces continue to pound the Red Infantry in Firnskuppe, who in turn continues firing at the Blue Skirmishers in the heavy woods.

The Red Cavalry moves to the hill in order to secure the NE quadrant while the Red Skirmishers occupy the cover of the farm to secure the NW quadrant.

Turn 7

This turn was a bit of jockeying about for Red. As the Red Skirmishers are a temporary force (they will go away after this battle), losing them is not a great loss. They move from the farm to the open ground in C3. Next turn they will be able to fire upon the Blue Skirmishers in the woods, hoping to support Firnskuppe. Because they now occupy the NE quadrant the Red Cavalry move from the hill to A3, occupying the NW quadrant. Blue forces continue to blaze away at Firnskuppe.

Turn 8

This turn was significant in that it saw the destruction of the Blue Skirmishers (to musket fire) and the Red Infantry barely holding on. Meanwhile the Red Cavalry slipped to the West, ready to enter Firnskuppe should the Red Infantry fall.


With the end of round 2 the score stands at 3 VP for Red and only 1 VP for Blue.

Turn 9

If you read my discussion on casualty recovery you will remember that there is a significant difference between a unit alive at the end of the battle and one that was eliminated. Infantry with 1-5 hits remaining loses 5 hits permanently on a '1' or '2' (on a D6), yet if it is eliminated by musketry it loses 10 hits on a '1' and 5 hits on a '2' or '3'. Because of this the Red Infantry cannot afford to take the risk of two more turns of fire, especially with another Blue Skirmisher unit coming on this turn. For that reason I decide to retreat out of Firnskuppe with the Red Infantry, replacing it with the Red Skirmishers. (Skirmishers can move through Infantry and vice versa.) But not before one more shot from the Blue Mounted Skirmishers…


Turn 10

The Blue force can clearly see that the Red Infantry have escaped their destruction, and really have no way of capturing Firnskuppe, so they decide to cut their losses and retreat South. The Second Battle of Firnskuppe is over with yet another Eastonian loss.

Aftermath

The Eastonians have lost one Skirmish unit to musketry, so they lose 10 hits on a '1' (or less) and 5 hits on a '2' (out of the unit's 12 hits). Because they were on the losing side they subtract 1 from their die roll. They rolled a '4', so they will all return to battle once they have regrouped.

The Westonian Infantry lost 14 hits so with 1-5 hits remaining, they lose 5 hit on a '1' or '2'. They roll a '3' so they too have no permanent losses after regrouping.

Summary

I always think that, because Skirmishers are so weak in OHW, these battles where one side is all Skirmishers, it is going to be a drag. This time was closer than the last.

In the first battle, the Eastonians had the village as defense and fog to ensure that the attacking Westonians had no cover to use. In this battle, had the local rabble not sided with the Westonians, I think they might well have lost their Infantry and lost the battle on victory points.

I have long groused about using event charts and random tables in solo games. I still contend that using those elements to affect the core game mechanics is not a good idea, but I am liking it for modifying the scenario and battle environment.

Using the Warcry Battleplan Cards was also very easy to interpret to the Horse and Musket period. Sometimes it takes a bit of narrative to figure out how the units end up split to match the deployment card, but it is nothing significantly difficult.

I still have to question the casualty recovery. I am going to stick with the current recovery process just to see how it continues to play out. I don't want the forces to deplete too quickly, but there needs to be some consequence to battles, won or lost, doesn't there? As it stands, the original goal of the campaign was to provide interesting, linked battles and this has definitely filled the bill so far.

What do you think? Is this sort of battle report useful (for your own ideas on solo gaming)? Is it interesting? Do diagrams showing movement and firing convey more data than pictures of a game with miniatures? Do you look for battle reports with miniatures or do you view it as "eye candy"? My goal is to make posts that are both informative – in terms of how to game solo – as well as entertaining.

Sunday, April 10, 2022

The Battle of Firnskuppe

 This is the tactical battle for my first engagement in my solo campaign, The First Elopean War. I have decided to use the rules One-Hour Wargames (OHW) by Neil Thomas to fight out the tactical battles. The only difference from the normal rules in that I used a 6" square grid for regulating distance. For the campaign, I am using The Solo Wargaming Guide (TSWG).

In a recent blog post (on my other blog) I went over the process that I am using to convert campaign units to OHW units and back again. Let's talk about the complete process for taking a contact on the map from the campaign to a battle on the tabletop.

  1. Define the forces that will be engaged.
  2. Define the terrain on the tabletop.
  3. Determine which side has the tactical advantage.
  4. Determine each force's baseline.
  5. Determine each force's objectives.
  6. Determine battlefield conditions.
  7. Determine each force's available stratagems.
  8. Deploy each side's forces.
  9. Start the battle.

Pre-Battle Sequence

Determine the Engaged Forces

Although this might be a relatively straightforward step, as indicated in the blog post above, there are some options and a little bit of bookkeeping. Because OHW normally has 15 hits per unit, any understrength units need to be indicated. Further Light Infantry companies and Light Cavalry squadrons can be deployed as either Infantry and Cavalry units, respectively, or as Skirmisher units. How these troops are deployed would be determined at this step.

The Westonians have five Light Infantry companies and five Light Cavalry squadrons at their disposal while the Eastonians have two Light Cavalry squadrons to call upon. As the Westonians are at the strategic command of my gaming buddy Justo, and he consolidated all of his companies into Regiments, I will treat all of his Light Infantry as Infantry units and his Light Cavalry as Cavalry units. I guess that is just their culture.

As the Eastonian commander I have a choice of making a very weak (6 hits) Cavalry unit with my two Light Cavalry squadrons, or making a weakened (12 hits) Skirmisher unit. As I did not define a 'tradition' for consolidating companies, as Justo did, I will allow the local commander to randomly determine it. Because I think the Skirmisher unit is more survivable, I will use the following table to make the decision, rolling enough D6 until all the companies and squadrons are accounted for.

Die RollResult
1-4Use 2 ½ companies/squadrons to form a Skirmisher unit
5-6Use 5 companies/squadrons to form a Infantry/Cavalry unit

Using that table I roll a 4, meaning the two squadrons will form a Skirmisher unit. As it is only a partial unit (2 instead of 2 ½ squadrons), the unit has 12 hits.

Determine the Tabletop Terrain

The method used in TSWG is to use playing cards to randomly determine the terrain. (Because part of this campaign is to convince myself that using lots of random elements for solo gaming – which both TSWG and Featherstone's solo gaming books use – is not so bad, I felt I needed to use as much of it as possible.) Because OHW on a grid has a board that is 6 squares wide by 6 squares deep, I decided to use one playing card for each square, largely because the campaign hex being fought in is a wooded village. If it had been a clear hex I would have drawn 3 cards wide by 3 cards deep, randomly rolling which of the four squares got the terrain indicated.

In the TSWG system only black cards produce terrain, here is what I drew.

Black KingRed QueenRed 6Red 8Black 7Red Ace
Red KingRed 8Black JackBlack AceRed 5Red Jack
Red 4Red KingBlack QueenRed 2Red JackRed 2
Black QueenBlack 8Red JokerBlack 5Black 6Black Ace
Red 3Black 10Black 8Red 10Black 9Black Joker
Black 3Black KingBlack 2Black 2Black 7Red Queen

This translates to the following terrain.

Fields


Lt Woods


FarmHill

RoadRoadFieldsRoadRoadRoad
FieldsLt WoodsFirnskuppeHvy WoodsHvy WoodsHill

LakeLt WoodsRoadLt WoodsHill w Lt Woods
HillFieldsHillHill/RoadLt Woods

By the way, this engagement was taking place on the map at the town of Firnskuppe, so the Red Joker was replaced by the town.

Because TSWG tells you to not slavishly follow the cards, I made a few adjustments to the terrain.

As I am using the Horse & Musket period of OHW rules, here are the effects of the terrain.

Road - Units moving by road increase their movement distance by 3" if their entire move is spent on the road. This bonus may not be received if charging.

Lt Woods - Only Skirmishers may enter. Units receive ½ casualties from firing.

Hvy Woods - Only infantry Skirmishers may enter. Units receive ½ casualties from firing.

Lake - Impassable to all units.

Firnskuppe - As this is a Village (class E) and not a Town (class D or better), movement is not affected for any unit. Units receive ½ casualties from firing.

Farm - Skirmishers receive ½ casualties from firing.

Fields - Cavalry movement is halved. (In terms of a square grid that means Cavalry may enter the Fields on its second square of movement, but only receives one square of movement when exiting the Fields square.)

Hill - Units in close combat defending a hill from an attacker not on a hill receives ½ casualties.

Determine Tactical Advantage

According to TSWG, each force's commander has a Commander's Competency Rating (CCR). The named commanders (Brigadier Generals) had their values rolled at the start of the campaign, with potential values from 1 through 6. All non-named commanders automatically have a CCR of '3'. As both sides are using non-named commanders, they both have a CCR of '3'.

Tactical Advantage is determined by having each side roll a D6 and adding their CCR. The higher value wins.

Westonia rolls a '3', adding 3, for a total of 6. Eastonia rolls a '6', adding 3, for a total of 9. Eastonia has the Tactical Advantage.

Determine Baselines

TSWG gives several options for baseline configurations, as shown in the image below.

I allow the side with the tactical advantage to choose the configuration. If there was a tie, there would be a die roll.

Counting the top of the map as North, the Eastonians occupy rows 4 through 6 while the Westonians must enter the board anywhere on row 1. Westonians can choose to send a flanking force, but must 'secretly' declare whether it will be their left flank (east of the town) or right (west of the town).

Determine Condition, Objectives, and Stratagems

A while ago I purchased a product called Kings of War: Battlefield Cards. Unfortunately, Mantics Games no longer sells them, but you can often find them on eBay or dusty gaming store shelves. These are very similar to the Warcry Battleplan Cards in that you get Objective, Conditions, and Strategy cards, allowing you to modify game scenario easily.


The idea is that you draw a Condition card to potentially modify the conditions on the battlefield (most of the cards say the conditions are normal, however), set your primary and secondary objectives (beyond the normal objectives of defeating your opponent's forces and being the last to occupy the battlefield), and potentially use stratagems during the game.

The strategy cards a little boosts that can be played during the battle. As they are specific to Kings of War, they may take a little interpretation to make them useful for OHW.

Each side will be allowed to draw a number of strategy cards based on the following formula:

  • Draw 1 card for every three full Infantry Regiments.
  • Draw 1 card for having at least one Cavalry Regiment.
  • Draw 1 card for having at least one Artillery Battery.
  • You may always draw at least one Strategy card.
  • You may not draw more than three Strategy cards.

Conditions

For this battle I drew the Reduced Visibility condition card, reducing all line of sight to 18" and any ranged attack beyond one square being at D6-2.

Objectives

The Eastonians drew the following objectives:

Primary: Place a Bounty token on each of your opponent's three most expensive units. 2 VPs if at least one of these units is eliminated. 1 VP for each of these units eliminated in melee. (This latter clause is impossible for Skirmishers as they cannot enter close combat in OHW.)

Secondary: 2 VPs if the total points (companies/squadrons) you eliminated if higher than the total eliminated by your opponent.

The Westonian objectives are:

Primary: 3 VPs if you have more strength (companies/squadrons) within two squares of the exact center of the board than your opponent. 2 VPs if you hold or contest the Base Objective on your half of the board.

Secondary: 2 VP if you hold or contest the Base Objective on your side of the board.

Because the Base Objective is a part of the Westonian objectives, and they are repeated twice, I decided that the two base objectives were the east road (column A, row 3) and the west road (column f, row 3).

You might be wondering what value VPs hold for OHW. To my mind VPs will determine the 'winner', which in turn will determine how much of the casualties from the battle will be returned as dead, wounded, or effective. The winner will have more casualties returned as effective than the loser.

Also note the difference in potential victory points. The Eastonians have a potential of 4 VPs from Bounties, 2 VPs from melee, and 2 VPs for inflicting more damage, for a total of 8 VPs (of which 6 VPs are only feasible). The Westonians have a potential of 3 VPs for holding the center, 2 VPs for holding the east road, and 2 VPs for holding the west road. As they only have two units, they cannot hold the center and both roads, so only 5 VPs are feasible.

Stratagems

Both sides get one Strategy card. The Eastonians draw:

Sudden Faith: Subtract 1 from a nerve test made by you or your opponent. (Because OHW does not use nerve tests, but represents morale in terms of hits, this means that the first loss of hits to your unit will be one less than what is rolled, to a minimum of 0.)

The Westonians draw:

Stolen March: You may deploy your units up to one square closer to the center line than normally allowed in this scenario.

Deploy Forces

As they Eastonians won the tactical advantage, the Westonians must deploy first. Because of the Strategy card they may either play it at the start, and deploy on row 1, or choose not to play it and enter row 1 on the first turn. Further, they may choose to flank march with one of their two units. Let's determine which deployment they will use.

First Die RollSecond Die RollResult
1-41-2Infantry unit deploys on C1. Cavalry unit marches on turn 1.
1-43-6Infantry unit deploys on C1. Cavalry unit deploys on B1.
5-61Infantry unit marches on turn 1. Cavalry unit marches on right flank.
5-62-4Infantry unit deploys on C1. Cavalry unit marches on right flank.
5-65Cavalry unit marches on turn 1. Infantry unit marches on right flank.
5-66Cavalry unit deploys on C1. Infantry unit marches on right flank.

I chose the basic plan as the Infantry attacking through the Farm and securing Firnskuppe for 3 VPs while the Cavalry would secure the west road (where the main army is coming from). However the die roll could indicate otherwise.

I rolled a 3 followed by a 5, so both the Westonian Infantry and Cavalry will start on board, in squares C1 and B1, respectively. The Eastonian Skirmisher will start in Firnskuppe.


Turn 1

Westonian (Red)

Infantry moves from C1 to C2. Cavalry moves from B1 through A2 to A3. No fire.

Eastonian (Blue)

Skirmisher holds. No fire is allowed due to the Reduced Visibility condition. The Eastonian commander attempts to roll his CCR (or lower) and fails. They cannot retreat.


Turn 2

Red

It is pretty clear that Red will have the worst of the musketry exchange as the Infantry will fire at D6-2 from C3 to C4, but the Skirmishers will only take ½ casualties due to the cover from the Village. They, in turn, will fire back at D6-2 and the Infantry will have no cover from the Fields. Nonetheless, the Infantry needs to soften the Skirmishers up before the Cavalry is allowed to charge in.

Infantry moves from C2 to C3. Cavalry holds. There is no firing.

Blue

Skirmishers fire, but score no hits. The Eastonians succeed in rolling their CCR, so they now have the option of retreating from the battlefield.


Turn 3

Red

Cavalry holds. Infantry fires, with the Skirmishers playing their stratagem, also resulting in no hits.

Blue

Skirmishers fire, scoring 3 hits.


Turns 4, 5, and 6

Red

Cavalry holds. Infantry fires, scoring no hits.

Blue

Skirmishers fire, scoring no hits.

Turn 7

Red

Cavalry moves from A3 to B4. Infantry fires, scoring 2 hits.

Blue

Skirmishers fire, scoring 3 hits.


The Red Infantry is now down to 9 hits, having lost two companies, while the Blue Skirmishers has only lost ⅓ of a squadron. Seeing that the Red Cavalry is flanking them, but have entered the Fields where they will be slow in exiting them, it looks like a good time to retreat. The Westonians will have 5 VPs and the Eastonians 4 VPs; a very narrow victory for the Westonians.

The Firskuppen Husaren withdraw down the east road to warn the garrison in Erlenloch that the Westonians are coming, and the battle draws to a close.


I will be picking up on how to deal with casualties and convert from OHW units to campaign units back on my Dale's Wargames blog.

Please note that I have started using Amazon affiliate links for any Amazon product I feature in my blog posts. You don't have to use them, of course, but anything Amazon gives me does not affect the price you pay, so using it contributes to my caffeine-fueled blog posts' funding.

Saturday, January 22, 2022

Review of Adjutant Introuvable and Test Game

Adjutant Introuvable by Nic Birt is billed as an "Auto Strategy System for Miniature Wargames". 

Adjustant Introuvable (AI) aims to provide a strategy (the overall plan) to the absent opponent when engaging in solo wargames. AI attempts to maintain a reactive and dynamic plan throughout the battle through some general tactical guidance.

Strategy is fairly generic across historical military periods and therefore this system is appropriate for most ages from ancient to modern. However, the tactics have changed … and for this reason the tactical level of AI is provided in simple generic terms that will require interpretation to suite (sic) particular armies.

So now we understand what the rules are trying to accomplish, let's review what I think a good programmed opponent provide. Generally speaking, it must answer these four questions:

  • Which side gets to act next?
  • Which unit gets to act next?
  • Which actions will the acting unit take?
  • How will the acting unit execute those actions?

As previously noted, so rules answer these questions automatically, without the use of special "solo gaming" mechanisms. For example, if you are using rules that are IGO-UGO the answer to the question "Which side gets to act next?" is taken care of. Whatever side is the active side gets to act next until their turn is complete.

For games where the turn sequence consists of phases where all units perform the same actions at once, in any order the player likes (most IGO-UGO rules), the question of "Which unit gets to act next?" is also generally moot. This usually only comes up when two units are trying to move through the same physical space, in which the player generally moves the unit that can move the farthest first, so its movement is not blocked by the slower unit.

For rules where a unit can move, fire, and conduct close combat all in a single turn, the question "Which actions will the acting unit take?" tends to be less critical of a decision than in rules where, say, a unit can only move or fire. Nonetheless, this is where the programmed opponent starts to come into play as you need to know what the objective the unit is trying to accomplish.

Finally, few solo game systems answer the last question. In order to specify "How will the acting unit execute those actions?" they likely need to be written specifically for the rules you are using and possibly even the scenario and side you are playing. (The new Undaunted: Reinforcements, which I hope to be reviewing and testing here soon, would be an example.)

Before we take a look at how AI handles these questions, we note that "AI has been designed to work with wargame rule systems that operate with an alternating turn sequence (one side moves, then the opponent moves, and repeat). It is assumed the average game length will be between 6 and 12 of these double turns. For an effective use of the strategy plans it is best to have at least 10 units that are deployed by the AI side." For this reason I will be using the rules One-Hour Wargames (OHW), which I have reviewed here, only modified for using a 6" square grid.

Setup

The first task is to divide the board into a three-by-three grid. Given that out board is already nicely divided into a six-by-six grid, the AI grid cell will contain four cells of the board. Note that this makes counting terrain values (see later) much easier.

Set up the battlefield as normal and deploy the player's forces while also providing orders for the first turn. If the player wishes to simply react to the programmed opponent then the player may not make any moves for the first two turns.

In this test game I have decided to play the defending side in a battle similar to Guilford Courthouse, of the American War of Independence. The Patriots are therefore initially passive, firing at the advancing British, so counting them as passive seems the better option.

AI provides nine strategy cards, which outline the plan for how the programmed opponent will conduct battlefield operations (at a high level). The rules direct you to draw three randomly and then perform a calculation for each strategy to determine which of the three to use. The strategies are named: Equal Attack; Center Attack; Left Flank Attack; Right Flank Attack; Envelop From Left; Envelop From Right; Oblique Left Attack; Oblique Right Attack; and Ambush. I chose randomly and drew Envelop From Left, Envelop From Right; and Center Attack.

The strategy calculation consists of looking at the aggressiveness of the strategy on the left, center, and right and comparing it to the terrain in the left, center, and right. Here is what the board looks like, set up.

As shown in the image above, the map contains a grid for easy reference to terrain, units, movement, and combat.

  • E1 contains a Town. (In this scale, it is a Courthouse and outbuildings.)
  • B2 contains the West side of a Hill and a Patriot Infantry unit with 15 hits remaining.
  • C2 contains the East side of a Hill and a Patriot Infantry unit with 15 hits remaining.
  • D2 contains a Patriot Artillery unit with 15 hits remaining.
  • E2 contains the North side of a Plowed Field.
  • F2 contains a Patriot Cavalry unit with 15 hits remaining.
  • E3 contains the South side of a Plowed Field.
  • A4 contains the West side of a Woods.
  • B4 contains the East side of a Woods and a Patriot Skirmisher (Rifle) unit with 10 hits remaining.
  • C4 contains a Stone Wall and a Patriot Infantry (Militia) unit with 10 hits remaining.
  • D4 contains a Stone Wall and a Patriot Infantry (Militia) unit with 10 hits remaining.
  • E4 contains a Woods and a Patriot Skirmisher unit with 10 hits remaining.

With the terrain set up and the player's units deployed, it is time to determine which strategy AI will use. You start by calculating the strength of each strategy versus the terrain it is facing. Each strategy card shows whether the left, center, and right sectors (indicated by the red grid) are moving rapidly, advancing, ambushing, or holding. You use a table that compares that strategy to the terrain found in that sector to derive a score, which is then combined to determine how effective the strategy is to this scenario. The highest score of the three selected strategies is the strategy that the programmed opponent will use.

Without going into the details of the formulas (that is what the $5 price is for), the Envelop From Left strategy calls for a rapid advance on the left, holding in the center, and an advance on the right. The Envelop From Right is the mirror to that. Finally, Center Attack is an advance on the left and right and a rapid advance in the center. The significance of the movement (hold, advance, etc.) is how far through the board the program intends to advance. Hold only considers the programmed opponent's baseline ares (rows 5 and 6 in this case). Advance considers up through no man's land (rows 3 through 6), and rapid advance considers all rows in the sector. Let's compare the scores.

Envelop From Left

The Rapid Advance on the left starts (reading from the opponent's baseline) with Open terrain (0 points), then moves through the Woods (-1 point), then ends in Hill terrain (-1 point) for a total of -2 points.

The Hold action in the center only considers the Open terrain on its baseline, which gives it a score of -1.

The Advance on the right scores 0 points for the Open terrain and -1 for the Woods in no man's land, for a total of -1.

After scoring each sector a random factor of 0-3 points is added for a total. This strategy earned a -3 (after rolling +1 point for the random factor).

Envelope From Right

I will condense these down to Left -1, Center -1, and Right -2, Random 0 for a total of -4.

Center Attack

Left -1, Center -2, Right -1, Random +1 for a total of -3.

Because Envelop From Left and Center Attack are tied, there would normally be a roll off. However, I have decided to go with a Center Attack because Woods in OHW are essentially impassable terrain to five of the six units that the British have, thus attacking troops would have to flow through to the center, making this a Center Attack of sorts anyway.

With the strategy decided we now need to deploy the units to either the left flank, center, right flank, or the reserves. Troops are categorized as either Regular, Mobile, or Support. This is cross-referenced with the mission (Advance, Rapid Advance, Hold, or Ambush) and the target terrain (the terrain in the grid indicated by the mission). This yields a die roll to indicate if the unit is deployed in that sector or not.

Essentially you are rolling a die for each unit to determine if it is assigned to a specific mission, rolling for them in the order of Ambush, Rapid Advance, Advance, and Hold. Any units not assigned to those missions are placed in the Reserve.

So I have four Infantry, one Cavalry, and one Skirmisher. Starting with the Infantry (Regular) and rolling to assign to the Rapid Advance in the Center, with the target terrain of the Hill, I would need a 5+ to have a unit assigned. I roll 2, 2, 3, 5 so one Infantry unit is assigned to the Center. Next rolling for the Cavalry and Skirmisher (Mobile), still for the Center, I would need 4+ to have a unit assigned. I roll 2, 3 so neither is assigned.

Now I do the same for the Left, which is an Advance to the Woods. Infantry needs a 4+ and Mobile needs a 6. Because one Infantry is already assigned to the Center, I only have three Infantry remaining to assign. I roll 1, 1, 6 so one Infantry is assigned. I roll 5, 5 so no Mobile is assigned to the Left.

Finally I do the Right, which is an Advance to the Woods. Only two Infantry to assign and I roll 3, 6 so one gets assigned to the Right. I roll 2, 6 for the Mobile and the Cavalry gets assigned to the Right. (I rolled off to see whether it was the Skirmisher or the Cavalry.)

The remaining Infantry and Skirmisher unit gets assigned to the Reserve, which according to the strategy card, is behind the Center.

So Now What?

Now, it is time to start fighting the battle. When it is their time to act each mission force (sector) will roll a die, cross reference it to their mission, add or subtract 1 based on how well the mission is going, and get a Tactic to use for that turn. (Troops in the Reserve will deploy on a 5+.) The tactics are as follows.

  • Charge - move rapidly towards objective, initiate combat whenever a win is possible, and bypass strong opposition.
  • Engage - move steadily toward objective, initiate combat only when favorable results are probable.
  • Probe - move cautiously, initiate limited disruptive combat when favorable result is most likely.
  • React - hold ground, initiate combat only against weakened or breaking opponent.
  • Relieve - retire to advantage, make defensive formations and positions.

These tactics are listed on each strategy card, along with the die rolls needed for each action.

Some of these will be hard to interpret, especially where in this scenario the programmed opponent starts within musket range of my troops. Here is the final setup.

As you can see, two of the British Infantry are Elite, and thus have 20 hits remaining, while all other units have 15 hits remaining.

There is a tendency in rules to make militia and elite troops overly weak or strong, in comparison to regular troops. For example, I have seen them being given modifiers to hit, i.e. the ability to inflict casualties, while simultaneously giving them morale modifiers, i.e. the ability to withstand casualties. Although many would say this is correct, I believe it is not in that the accuracy of the musket is horrendous (especially after fouling from a few shots) and thus the difference in the three types to inflict casualties is negligible. To me, the best way to represent quality of troops is to rate their ability to stay combat effective, which in terms of OHW, it the number of hits it can sustain.

Turn 1

The British start first. Looking at my strategy card the Center will Charge on a 4+, Engage on a 1-3, and Probe on a 0-. This is a D6 roll with a -1 because it is one British (Elite) Infantry against two Patriot (Militia) Infantry behind cover. I roll a 1 making it 0, thus the British decide to stand and fire.

On the left and right flanks they are advancing, so the cards says to Engage on a 5+, Probe on a 2-4, and React on a 1-. Both the left and right flanks get a Probe result. The Infantry will stand and fire while the Cavalry will hold in place.

Because this is the first turn, there is no roll for reinforcements.

As stated earlier, the best solo systems answer all four questions in some way. What action the units will take has been answered (firing instead of moving, for all three cases), but the answer to the last question, which is how to execute the action, i.e. which unit do I fire at, may not be clear. The rules do state that the combat should have a "favorable result". So, what is that?

In OHW I often analyze combat in terms of Average Turns to Eliminate (ATE), or the number of turns, on average, it takes to eliminate the enemy unit. In this case the British Infantry roll 1D6 to determine the number of hits inflicted on the enemy, so 3.5 hits per turn. Units in cover, such as in Woods or behind a Stone Wall, take 1/2 the hits, rounded up. If the target has 15 hits then Infantry's ATE is 5 if the target is not in cover and 8 if the target is.

In the case of the left flank Infantry firing, both targets in range are in cover so both are equally valid. One could next look at the hits remaining (essentially the ATE) to determine the weakest target, and thus the most vulnerable and therefore the higher chance of success. Again, both targets have the same number of hits, so the ATE is tied. At this point either target is equally valid and the rules are thus silent on selection, so presumably a die roll would be in order. However, one additional difference to not is which target can inflict more damage (thus making them more of a threat), i.e. what is the target's ATE against you. In this case the Patriot (Militia) Infantry is lower and therefore the greatest threat. That said, I am going to shoot straight forward and into the sector where my mission is located.

On the right flank the case is largely the same: fire at a Skirmisher in the Woods or an Infantry behind a Stone Wall? The difference is that if the Infantry fires on the enemy Infantry, it is potentially doubling up its fire against that target.

Here is the result of the British first turn.

Remember, because I did not write order before the British set up, I am hampered from making any moves for turn 1 and 2, which is acceptable as I am simply going to fire at the attacking British. Here is the end of turn 1.

While the Skirmishers on the left muffed their shot, the right taught the enemy Infantry to ignore it at its own peril. The two Militia Infantry in the center absolutely pounded the center British Infantry. Had it not been an elite unit (starting with 20 hits), it would now be within one good die roll of being eliminated.

Turn 2

As with the first turn, each sector needs to roll its tactics, and reinforcements can be rolled for.

Left - Probe; Center - Charge; Right - Engage; Reserve - no reinforcements.

The Center charges as the British realize that they cannot afford to slug it out with the two Militia units. Because it moves forward, the British Infantry moving to D5 now blocks the Infantry in E6 from firing on the Militia in D4.

On the Right the Cavalry moves forward. If it moved to F4 it risks being fired upon by the Artillery and charged by the enemy Cavalry, so it only moves to F5.

This is the last turn in which the Patriots cannot react, so all they do is fire.

The British Grenadiers in D5 are looking pretty bad. With it being 'outnumbered', it is unlikely to be able to roll a 'Charge' result. This is one thing I have a criticism about with chance-oriented programs. It sometimes feels like 'morale' is baked into the results. Shouldn't the core rules cover morale, rather than the solo mechanics?

Turn 3

As with last turn, each sector needs to roll its tactics, and reinforcements can be rolled for.

Left - Engage; Center - Charge; Right - React; Reserve - no reinforcements.

The British on the left and right flanks continue to fire, but the cavalry stands. The British Grenadiers in the center rolled well and can continue the charge. Had they rolled less, they would have stood and fired, which would have been a bad result.

This was a good turn for the British. Both the Infantry units on the left and right flanks scored a '6', resulting in 3 hits each on the Patriot Skirmish units. The British Grenadiers charged, inflicting a single hit and forcing the Patriot Militia to retreat.

Note: British Infantry being able to charge into hand-to-hand combat and forcing Patriot Infantry and Skirmishers to retreat from hand-to-hand combat is not a normal rule for the OHW Horse and Musket rules, but is added by my AWI variant.

Now that the first two turns are up, I can finally order my Patriot units freely. At this point, however, I am going to leave the battle report. The idea was to test the AI system and see it in action.

Summary

Let me start by saying these rules are a mere $5, can be purchased online, and are delivered as a PDF. It is value for money. All of that said, to me it is an 'idea generator' rather than a full blown system of a programmed opponent. I see that these sort of systems can cover the following mechanics: overall battle plan; distribution of forces; unit deployment; unit mission; and unit tactics.

Overall Battle Plan

Basically the goal is to help the player come up with a basic strategy for the programmed opponent. AI does this providing you nine basic battle plans. Providing you a formula to calculate the best attack strategy based on terrain is very valuable. If fact, I think that is the singular best idea in these rules. For once a system takes terrain into account, giving it a value. Most points systems, for example, do not take the value of terrain into account, unless it is man-made like an entrenchment or a fortification. AI looks at the terrain within reach of your mission (how deep onto the battlefield you intend to take) and evaluates the difficulty of achieving it.

The only issue I take with the formula is that there are certain unstated value judgments built into that formula. For example, one element that kept coming up while using AI was that the rules I was using, OHW, does not allow most units to enter woods at all. Many rules take the approach that woods slow movement and provide cover, so the idea that you can attack a woods with any unit is somewhat universal. If you are using something like OHW where you can shoot at units defending a woods, but can never take it, the formulation should actually be harsher for the woods being present.

In the example above, if your mission is to rapidly advance on the left, i.e. advance to the enemy's row, the presence of the woods in row 2 makes this impossible if, say, your line infantry, cavalry, and artillery cannot pass through the woods and only your light infantry can. You could put infantry units in row 3 to shoot out the defenders, but at some point your infantry, cavalry, and artillery will have to bypass the woods through the center, while your light infantry moves in to occupy the woods, keeping the enemy light infantry out while your other forces pass by through the center.

So, is it perfect? No. It is naturally generic. That is why I say that these rules are great as a starting point, a template from which to build a more specific program that meet your scenario, forces, and rules needs and restrictions.

One final note: I am not sure why the author wants you to randomly select three possible battle plans, calculate the most effective one, and then use that, rather than having you calculate all of them. Given that you are playing solo, time is one factor that you have on your side. All of this work can be done before you actually lay out the terrain and troops on the board, so even if your time is limited in how long you can keep the game set up, this time calculating does not count against it and can even be done the night before.

Distribution of Forces

Again, my experience with this aspect may be colored by OHW not allowing certain unit types to move into Woods, but having a random roll to determine if a unit will be in a given sector feels … random. That said, I don't have a better way of changing the charts so that it makes more sense for OHW.

Unit Deployment

This was something that seemed missing. Although AI helped you determine which sector of the battlefield your units were going to be assigned to, no mention on how that unit would be deployed in relation to the other units also assigned to that sector. As I sit here and ponder that question, any such rules would probably be very complex and not work well for all rules, so it is probably just as well that it was not addressed.

Unit Mission

I felt like this aspect was something I had not considered, which is the mission of the unit. Granted, the same mission is given to all units in the sector, but the idea a unit would intentionally only advance so far (if at all) until the mission was interesting. Note that missions are always to occupy the terrain in the sector. Generally these might be the objectives in a scenario, so I could see reverse-engineering the overall battle plan based on scenario objectives and victory points.

Unit Tactics

This was the one area I felt worked the least because there was so much interpretation as to what each tactic – Charge, Engage, Probe, React, and Relieve – really means. Take a game like OHW. The basic decision is first "Do I move or fire?" This is something many rules avoid as they allow a unit to move and fire in a single turn. It seems like the tactics should be more aligned with how the unit fights. Does it primarily inflict casualties by fire or hand-to-hand combat? If the former, are you in range yet? Do you have range 'bands' (short, medium, long, etc.) which affect effectiveness? If so, which band are you in?

Considering these types of factors would lead more to rule-based decision making system, rather than one driven by chance elements, but I think it is something to consider.

As stated previously, there is also an element of morale sprinkled into the tactics table, with less aggressive tactics implying a partial failure of morale being the cause for the less aggressive approach.

Final Analysis

Overall, how can you say that this is not good value for money at $5? (I hope Nic does not raise his prices after this review! 😄) There are far better, well thought out ideas that are actually useful to gaming solo than many of the books I have purchased that promise to tell me how to wargame solo. Just consider that, unless the main rules you play fit well into the model published in these solo rules, you should consider this a template for how to convert this process to the rules you use most often; it is a starting point.