Feedback
Let me start by saying that I do see some holes in the program I wrote already. I view this as a process that will be refined over time. That is why I want to work on a template for how to write these programs up and include some boilerplate rules. But, let me start with Shawn's comments.
Issue: Adaptation. The programmed opponent did not account for army composition adaptation or personal perspective. I initially wanted to use an Early Saxon army for Warlord Babbage with the Warband substitution for Infantry and no Cavalry. [This is an example of the type of adaptation Neil Thomas refers to in his rules.] The programmed opponent was perfectly suited to the rules as written, however, so any issue here was in my not discussing this issue before asking for the Dark Ages opponent. As we discussed, it was simple to just switch Red and Blue. Might be something to account for in a fully developed programmed opponent (probably more of a tie-in to historical flavor)?
Although I do account for varying composition, as allowed by the standard rules, the programmed opponent still depended upon the predominant unit type being Infantry. Simply using a force composed of Warbands and Skirmishers would probably have resulted in a disaster for that program. But who knows until you try it out? My point is that the more adaptable your program is to such a critical component – force composition – either the program will become very complex and conditional – i.e. a bunch of IF-THEN-ELSE statements – or very generic.
Issue: Rule #1. This rule states “Once a unit is on the hill, it may not move off.” From my understanding of this rule, I had several instances where a Red unit on the hill couldn’t move to flank a Blue unit attacking up the hill, so they remained in place.
So, after discussing this issue with Shawn there were several factors that led to this belief. I had put a statement in my Rationale section that did not appear in my rules: "The unit in D4 must be prepared to shift to the left flank of the hill (D3) if Blue attempts to flank the hill." At the end of Blue's turn 1, the situation was the following:

You can see that Red's units did not move on turn 1 (no reason to) and that Blue's move took one Warband down the road, flanking the hill's East end, while the other Warband threatened the hill frontally. This is exactly the move the Cautious Red Warlord should expect. The counter is the following.

The rightmost Red unit turns to face East and moves to the East end of the hill to block the Warband from gaining the height. This is a situation "in between" Rule #2 and Rule #3.
Rule #2 states: "If there is an empty position on the hill the Red Army unit that can reach the position the quickest – except Skirmishers – must move to occupy that position."
Rule #3 states: "If there is a Blue Army unit occupying a position on the hill the Red Army unit that can reach the position the quickest – except Skirmishers – must move to melee that unit. The closest Skirmisher unit must move to a position where they shoot at the Blue Army unit."
The situation is not really covered by either rule. Rule #2 needs to be refined to say that it does not apply if already on the hill. (If you didn't, then a unit on the hill would be moving back and forth each turn as it would move to an empty location on one turn and then move back on the following turn.) Rule #3 does not apply because Blue is not on the hill; it is poised to gain the hill in its next move. So there needs to be a new rule:
- If there is a Blue Army unit that can occupy a position on the hill in its next move the Red Army unit that can reach the position the quickest – except Skirmishers – must move to block that unit's move. The closest Skirmisher unit must move to a position where they shoot at the Blue Army unit.
What this rule does is create the moves indicated above. The rightmost Red unit moves East, blocking the flanking Blue unit's advance up the hill. That in turn exposes a position where the Blue unit attacking frontally could gain the hill. So the leftmost Red unit must also slide to the East (but still facing the unit down the hill) to block that move.
This brought up an interesting discussion between Shawn and I as it pointed out another reason why generic programmed opponents have a difficult time working. In order for this program to work the rules had to support such a maneuver. The first Red unit has to be able to face 90º and then move 6" along the hill in order to block the Blue flanking unit. The second Red unit has to "sidestep" – be able to move horizontally without changing face, or be able to pivot 90º, move, and then pivot 90º again – in order to execute the program. One-Hours Wargames is that flexible, but many other rules are not.
Even though this program is specifically for OHW it did get me thinking: why those particular starting positions? Why is the easternmost unit not already deployed to D3? Food for thought.
Issue: Rule #3. This rule states “If there is a Blue Army unit occupying a position on the hill the Red Army unit that can reach the position the quickest – except Skirmishers – must move to melee that unit. The closest Skirmisher unit must move to a position where they shoot at the Blue Army unit.” This caused the Red Cavalry unit [entering via the road] to ignore a Blue Skirmisher unit right in front of it and expose its flank in order to move to the hill. Ultimately this Red Cavalry unit was eliminated by skirmisher fire (but not until after the Red Cavalry unit had charged the rear of a Blue Warband unit and destroyed it). I’m not sure this is actually an issue as the hill is the objective. I just wanted to point out that this type of situation occurs.And it is a good point. This is where I am excited to have someone like Shawn write a different version of the Red Warlord. It sounds like his program might not take that risk of a valuable unit (Cavalry), exchanging it for an enemy Warband. His program might take into account the number of turns remaining and compare it against the average time for the Cavalry to deal with the enemy Skirmisher unit, say "If the turn is less than 8, you can ignore this rule in favor of another rule that could determine your action." Another equally valid method would be to write a rule with higher precedence. This would allow you to put your more specific cases at the top and your more general orders farther down.
Issue: Rule #3. See above for this rule's text, however it is referring to the second clause, which is regarding what a Skirmisher unit should do. No issues here, I just missed this operating rule when I played the game. I ended up largely forgetting about the Red Skirmisher unit until the Cavalry cleared the line of sight. Probably a wash as moving to have line of sight would have prevented shooting that turn.The other big "hole" in the program is when none of the rules apply to your units. What do you do then? Rule #4 ensures that the Skirmisher unit stays within 6" of the Red baseline, but doesn't tell you any other priorities. Same if two Cavalry units come on the road (the closest is to make for the closest gap on the hill, but what does the farthest Cavalry unit do), and so on. That has to be addressed.
Issue: Historical Flavor. As an option I would recommend adjusting the programmed opponents to reflect increased historical flavor, i.e. using “Mount Badon” instead of “hill,” adjust for certain army types, etc. Not necessary, just my personal preference.Interesting, as I had not considered that. I view the OHW variant as responsible for providing the proper historical flavor. But if there were a way to add historical flavor to the programmed opponent, I would surely do that. As for the scenario, I view OHW's scenarios as generic, although the author clearly gives a nod to historical battles some have been modeled after. If I were writing a programmed opponent for a specific historical battle I agree it would surely make sense to do so.
Issue: Overall Enjoyment. I very much enjoyed using the programmed opponent and I think it made me focus more on the objectives for both sides than if I had just played without the program. I think the game came in right around one hour. The only downside for me was trying to take notes throughout the battle (I was hand-writing the notes, so it was somewhat painful). The note-taking for feedback also reduced my mental imagery of warbands clashing against shield walls and charging cavalry, etc., but this has nothing to do with the program itself.Given that the result was a draw, it sounds like it can provide a decent challenge. But I am getting ahead of myself.
Battle Report – Shawn Versus Red Warlord Babbage
Again, this is scenario #8 (Melee) from One-Hour Wargames, playing the Dark Ages variant. The Red forces are the programmed opponent. Shawn has decided to play the Early Saxons, so Infantry and Cavalry units are exchanged for Warband units.
 |
| Arthurian British infantry occupy Mount Badon. |
 |
| Early Saxon warbands move to attack Mount Badon. |
 |
| The Saxong assault on Mount Badon begins a British reinforcement arrive. |
 |
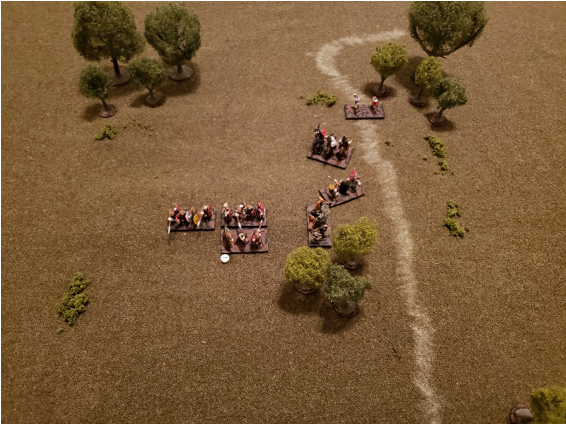
| A Saxon warband flanks the British position on Mount Badon and blocks the cavalry movement. Saxon reinforcements arrive from the road to the South. |
 |
| A unit of British infantry is eliminated on Mount Badon, but King Arthur and reinforcements are on the way. The British cavalry on the east flank rout a Saxon warband. Saxon reinforcements move around the woods to support the assault on Mount Badon. Saxon skirmishers block the road and take up position in the woods. |
 |
| The British cavalry on the east flank move to counterattack the Saxons. Fighting breaks out all along Mount Badon. Rival skirmishers along the road hurl javelins and bow fire at one another. |
 |
| The British cavalry on the east flank are destroyed by the combined effects of the melee and follow-on skirmish fire, but not before destroying another Saxon warband. King Arthur and his Knights move to flank the Saxon hold on Mount Badon. |
 |
| Another Saxon warband is destroyed on Mount Badon. This is followed soon after by a devastating flank attack against the remaining British infantry unit. King Arthur sweeps across Mount Badon, crashing into and destroying another warband. The British skirmishers along the road disperse their counterparts with effective bow fire. |
 |
| The remaining Saxon skirmisher unit pivots to meet Arthur's charge; both sides survive a round of melee as the battle ends in a draw. |
Summary
I knew the system would need some refinement and expansion, but I am pleasantly surprised that it stood up as well as it did on the first test by someone else. I look forward to anyone else giving it a try and providing feedback.
No comments:
Post a Comment