Introduction
This is the tactical battle for my second engagement in my solo campaign, the First Elopean War. I am again using Neil Thomas' One-Hour Wargames (OHW) to fight out the tactical battles. The only difference from the normal rules in that I used a 6" square grid for regulating distance. For the campaign, I am using The Solo Wargaming Guide (TSWG).
In the first battle the Westonian Advanced Guard, consisting of a Line Infantry Regiment and a Line Cavalry Regiment, attacking the barely mustered Firnskuppe Hussars, an understrength Light Cavalry Regiment. The Eastonians were driven from the town, leaving the Westonians in possession, waiting for the main forces to arrive.

The second engagement sees more Eastonian forces arriving, attempting to retake the town.
Pre-Battle
I have decided to try another system for determining what the battle's setup, victory conditions, and "game twists"; this time Games Workshops' Warcry. Why Warcry? It is a currently available game and thus its components are readily available. I am not suggesting you buy the rules or a boxed set, but you can buy the Warcry Battleplan Cards (WBC) separately. Like the Kings of War: Battlefield Cards, they use cards to provide you variations in your games. The WBC contains four sets of cards: the Terrain Deck; the Deployment Deck; the Victory Deck; and the Twist Deck.
The Terrain Deck dictates the terrain that will appear on the board. As Warcry is a skirmish game, this terrain is not really suited for the tactical level of game we are playing. Besides, we will be reusing the terrain from the first battle as this battle is also centered around the same area.
The Deployment Deck covers the deployment diagrams that are in TSWG (see image below), but offers far more variations.

The Victory Deck will serve as a replacement for the Objectives Deck from Kings of War. Again, as WBC is centered around game system, there may be a bit of interpretation to make it work.
Finally, the Twists Deck is akin to the Conditions Deck from Kings of War. It is to add a twist to the battle, hopefully without too much interpretation.
Deployment
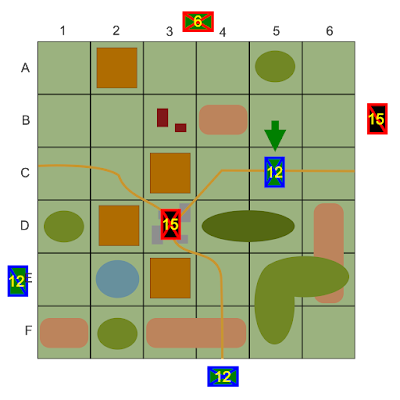
I drew the card "Deadly Gambit" (see image below). The two sides are shown as red and blue and each force is separated into three battle groups: Hammer, Dagger, and Shield. Each battle group must contain at least one unit (if possible) and no more than one-half of the units. The Shield group must contain at least one-third of the units, rounded up.

This is a complicated deployment as red force has their Dagger battle group in the SW corner, but the remaining groups are coming on from the N and the NE. The blue force has their Dagger battle group in the NE corner, and the remaining groups coming on from the S and SW. So the Dagger forces are positioned near where the enemy will come on (hence a deadly gambit).
Given the locations of the forces on this card and their locations on the map I can envision the Westonian infantry patrolling close around the town of Firnskuppe, thus it makes sense that the are red Dagger. Because the red Shield must contain at least one-third of the forces (in this case, one unit), the cavalry is red Shield. It appears they were patrolling the woods outside of Firnskuppe and are coming back due to the town coming under attack.
The Eastonian forces are approaching Firnskuppe from the East and South. It makes sense (to me) that the light infantry from the East are in the blue Dagger group. They are skirmishers and they appear to have infiltrated onto the board before the alarm was raised. The light cavalry from the East have swung around the town and are attacking from the SW (Shield group). Finally, the light infantry from the South are entering as the blue Hammer group.
Note the markers RND2 on the card. This indicates that these forces will come on at the beginning of Round 2.
Victory Conditions
As always, the primary objective of each side is the destruction of the enemy forces, but as I indicated last time, I wanted to determine a 'victor' for the purposes of determining which side would have a higher casualty rate. (The loser would have that higher rate.)

As shown in the image above, the victory conditions indicate that the map is to be divided into quarters. Each quarter generates a victory point at the end of each round. The battle ends after three rounds.
The first interpretation is 'what is a round'? Warcry generally lasts four rounds, so this indicates it is a shorter game. OHW typically lasts 15 games turns, so it looks like a round is roughly equivalent to four OHW turns. So this battle will last no more than 12 turns.
Further, the Hammer and Shield groups are to enter on round 2, so they will come on at the start of turn 5.
Finally, because the Eastonian force coming from the South (blue Hammer group) marches two hexes to get to the battle (the East force only marches one hex), I am imposing an additional delay. Blue Hammer will enter on round 3, or the start of turn 9.
The Twist
As shown in the image below, I drew "Sinister Bargain". This needs a lot of interpretation, given that it talks about chaos and a beast.
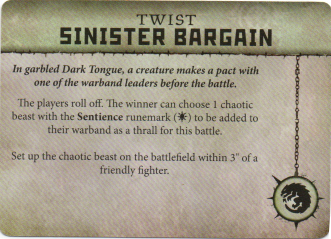
It is relatively simple though. The town of Firnskuppe is being fought over. Although it is a very small town (class E) with no inherent militia, I am going to treat this as a band of armed citizenry. If the Eastonians win the roll-off, they are patriots; it the Westonians win, they are collaborators who have been waiting to switch sides. The band will count as an understrength (one company) Skirmisher unit.
Rather than using a simple roll-off, I will use each side's Commander Competency Rating (CCR), which happens to be a '3' for both sides. Westonia rolls a '4'; Eastonia rolls a '3'. The Skirmisher unit goes to the Westonians.
Deployment
As a reminder, here are the effects of the terrain found on this board.
Road - (light yellow-brown line) Units moving by road increase their movement distance by 3" if their entire move is spent on the road. This bonus may not be received if charging.
Lt Woods - (light green oval) Only Skirmishers may enter. Units receive ½ casualties from firing.
Hvy Woods - (dark green oval) Only infantry Skirmishers may enter. Units receive ½ casualties from firing.
Lake - (blue-gray oval) Impassable to all units.
Firnskuppe - (four gray rectangles) As this is a Village (class E) and not a Town (class D or better), movement is not affected for any unit. Units receive ½ casualties from firing.
Farm - (two dark red rectangles) Skirmishers receive ½ casualties from firing.
Fields - (large brown square) Cavalry movement is halved. (In terms of a square grid that means Cavalry may enter the Fields on its second square of movement, but only receives one square of movement when exiting the Fields square.)
Hill - (light brown rounded rectangle) Units in close combat defending a hill from an attacker not on a hill receives ½ casualties.

As you can see in the map above, B5 contains the Blue Dagger and D3 contains the Red Dagger. (Normally, Red Dagger would be at E2, but as that is a lake square, and thus impassable, I decided to roll a D10 for the location of the unit. 1, 2, and 3 would be D1, D2, and D3. 4 and 5 would be E1 while 6 and 7 would be E3. 8, 9, and 0 would be F1, F2, and F3. With the roll of a '3', the unit ended up in the village.)
Units with green backgrounds are Skirmisher units, while those with black backgrounds are either Infantry or Cavalry. The numbers in the center represent the number of remaining hits.
Battle Plan
One of the things ideas in TSWG is to make three battle plans and to simply roll a D6 to determine which one to run.
Blue
The first battle plan (roll of 1-2) is for the Blue Dagger to get to cover in the NW corner to take that objective, then hold off the enemy for as long as possible. Hammer and Shield will both enter the SW quadrant to contest that quarter.
Battle plan 2 (roll of 3-4) is for the Blue Dagger to get cover in the SE corner to take that objective, while staying out of line of sight. When Shield enters the board (on turn 5), both will simultaneously attack Firnskuppe.
The final battle plan (roll of 5-6) is for Blue Dagger to immediately attack Firnskuppe in order to whittle it down so Blue Shield can take it as soon as possible.
Red
Battle plan 1 is to defend Firnskuppe with all units, as they arrive.
Battle plan 2 is to defend Firnskuppe with the Red Infantry, attack with the Red Cavalry (the closest unit), and hold the NW corner with the Red Skirmisher.
Battle plan 3 is to defend Firnskuppe with the Red Infantry, hold the NE corner with the Red Cavalry, and hold the NW corner with the Red Skirmisher.
Result
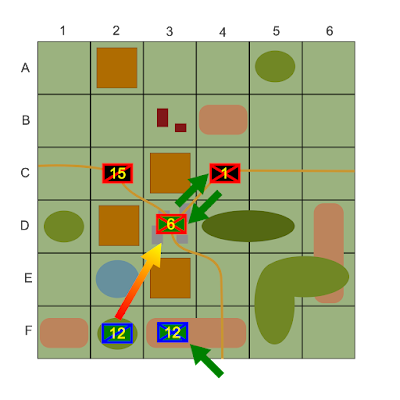
Blue will use battle plan 3 while red uses battle plan 2.
The Battle
Turn 1
Blue
Blue Skirmishers move from B5 to C5. Although the unit could have moved into range and line of sight by moving to C4, this would have put the Skirmisher at a severe disadvantage (it takes full damage, while the attacker takes ½ damage).
Let's stop for a second and go over which square the unit should move to. First, you need to understand my concept of Average Turns to Eliminate (ATE). If you look at the possible number of hits a unit can inflict, the number of hits remaining in the unit being fired upon, you get the average number of turns to eliminate that unit. Quickly calculating this value can help you determine which target you should attack (your ATE against the enemy unit) and where you should move (the enemy's ATE against your unit).
The average hits by Skirmishers and Infantry are:
| Die Roll | Skirmisher | Infantry |
| 1 | 0 | 1 |
| 2 | 0 | 2 |
| 3 | 1 | 3 |
| 4 | 2 | 4 |
| 5 | 3 | 5 |
| 6 | 4 | 6 |
| Average | 1.67 | 3.5 |
So the ATE of Infantry being shot by the Skirmisher is 15 hits / 1.67 or 9 turns (rounded up). The ATE of Skirmishers being shot by Infantry is 12 hits / 3.5 or 4 turns. Note that shooting at units in cover changes the ATE.
| Die Roll | Skirmisher vs Cover | Infantry vs Cover |
| 1 | 0 | 1 |
| 2 | 0 | 1 |
| 3 | 1 | 2 |
| 4 | 1 | 2 |
| 5 | 2 | 3 |
| 6 | 2 | 3 |
| Average | 1 | 2 |
The ATE of Infantry in cover being shot by the Skirmisher is 15 hits / 1 or 15 turns, while the ATE of Skirmishers in cover being shot by Infantry is 12 hits / 2 or 6 turns. Because the Infantry will (likely) remain in Firnskuppe it will always be in cover, so it will have an ATE of 15. If the Skirmishers fight it out of cover its ATE will be 4, but will jump to 6 if it moves to cover first.
With the target in D3 you have to be in the following squares to be in cover while also being in line of sight of Firnskuppe: B3, D1, D4, and F2.
Now let's think about the Red Cavalry that will enter on turn 5. With close combat you can also calculate ATE.
| Die Roll | Cavalry x ½ | Cavalry | Cavalry x 2 |
| 1 | 2 | 3 | 6 |
| 2 | 2 | 4 | 8 |
| 3 | 3 | 5 | 10 |
| 4 | 3 | 6 | 12 |
| 5 | 4 | 7 | 14 |
| 6 | 4 | 8 | 15 |
| Average | 3.5 | 5.5 | 10.83 |
Given these stats, the Skirmisher simply cannot afford to get caught out by the Cavalry. Thus the only safe squares for the Skirmishers are: D1, D4, and F2. This is why the Blue Skirmisher moved from B5 to C5. It is heading for the heavy woods in D4. Had it moved to C4 the Red Infantry would shoot it in the open, inflicting 3.5 hits. By moving to C5 it can still reach D4 next turn, but without being shot upon in the open.
Red
With the Blue Skirmisher hiding and the Red Infantry with orders to hold Firnskuppe, it has no action this turn other than to face towards the East.
Turn 2
The Blue Skirmisher moves from C5 to D4. Now it is safe from the Red Cavalry that will come on and has cover against the Red Infantry. It will still be outshot by the enemy, but its mission is to wear down the enemy for other units to take out. Meanwhile the Red Infantry fires, scoring a measly one hit.

Turn 3 and 4
At this point neither unit is moving and both are firing, so I will play out two turns. After that reinforcements will come on for both sides.

With the end of the 'round', Red scores 1 VP for holding the SW quadrant while Blue scores 1 VP for holding the SE quadrant.
Turn 5
Time to bring on the reinforcements! Remember that the Blue Hammer (Skirmisher) does not come on until turn 9, as it has farther to march to get to the battle. But the Blue Shield (mounted Skirmisher) can come on, as can both the Red Hammer and Red Shield.

So, let me explain the logic behind the moves. Blue Mounted Skirmisher is not Cavalry, so it cannot charge. It is essentially a fast moving Skirmisher unit that cannot enter heavy woods. So, like the Blue Skirmisher it needs to attack by firing and it wants to stay in cover. It has two basic missions: eliminate the Red Infantry in Firnskuppe and contest the SW quadrant. It can do this from either D1 or F2. Although the Red Cavalry cannot attack it in either square (Cavalry cannot enter light or heavy woods), the Red Skirmisher coming on can. So by choosing to move to F2, Blue can continue to attack Firnskuppe, but it makes it much harder for Red to disrupt that attack.
The Red Skirmisher is heading for the farm (B3) as it is cover and it allows it to control the NW quadrant, but it wants to ensure it gets there safely. Although no one is likely to attack it, moving behind the hill in B4 ensures that.
Red Cavalry is to attack any Blue unit brave enough to come out in the open, or to move into Firnskuppe if it becomes undefended. It cannot attack either Skirmisher unit as it cannot enter the woods squares, so it really has no target. At this point you have to ask yourself whether you feel it is legitimate to change plans or not, i.e. switch to contesting either the SE quadrant or holding the NE quadrant, rather than hunting for units to charge.
You might think it is rather disadvantageous for Red with all this woods, but remember that Firnskuppe is actually in a woods terrain hex on the main map. So if anything, this table is rather clear considering its surroundings.
Turn 6
The Blue forces continue to pound the Red Infantry in Firnskuppe, who in turn continues firing at the Blue Skirmishers in the heavy woods.

The Red Cavalry moves to the hill in order to secure the NE quadrant while the Red Skirmishers occupy the cover of the farm to secure the NW quadrant.
Turn 7
This turn was a bit of jockeying about for Red. As the Red Skirmishers are a temporary force (they will go away after this battle), losing them is not a great loss. They move from the farm to the open ground in C3. Next turn they will be able to fire upon the Blue Skirmishers in the woods, hoping to support Firnskuppe. Because they now occupy the NE quadrant the Red Cavalry move from the hill to A3, occupying the NW quadrant. Blue forces continue to blaze away at Firnskuppe.

Turn 8
This turn was significant in that it saw the destruction of the Blue Skirmishers (to musket fire) and the Red Infantry barely holding on. Meanwhile the Red Cavalry slipped to the West, ready to enter Firnskuppe should the Red Infantry fall.

With the end of round 2 the score stands at 3 VP for Red and only 1 VP for Blue.
Turn 9
If you read my discussion on casualty recovery you will remember that there is a significant difference between a unit alive at the end of the battle and one that was eliminated. Infantry with 1-5 hits remaining loses 5 hits permanently on a '1' or '2' (on a D6), yet if it is eliminated by musketry it loses 10 hits on a '1' and 5 hits on a '2' or '3'. Because of this the Red Infantry cannot afford to take the risk of two more turns of fire, especially with another Blue Skirmisher unit coming on this turn. For that reason I decide to retreat out of Firnskuppe with the Red Infantry, replacing it with the Red Skirmishers. (Skirmishers can move through Infantry and vice versa.) But not before one more shot from the Blue Mounted Skirmishers…
Turn 10
The Blue force can clearly see that the Red Infantry have escaped their destruction, and really have no way of capturing Firnskuppe, so they decide to cut their losses and retreat South. The Second Battle of Firnskuppe is over with yet another Eastonian loss.
Aftermath
The Eastonians have lost one Skirmish unit to musketry, so they lose 10 hits on a '1' (or less) and 5 hits on a '2' (out of the unit's 12 hits). Because they were on the losing side they subtract 1 from their die roll. They rolled a '4', so they will all return to battle once they have regrouped.
The Westonian Infantry lost 14 hits so with 1-5 hits remaining, they lose 5 hit on a '1' or '2'. They roll a '3' so they too have no permanent losses after regrouping.
Summary
I always think that, because Skirmishers are so weak in OHW, these battles where one side is all Skirmishers, it is going to be a drag. This time was closer than the last.
In the first battle, the Eastonians had the village as defense and fog to ensure that the attacking Westonians had no cover to use. In this battle, had the local rabble not sided with the Westonians, I think they might well have lost their Infantry and lost the battle on victory points.
I have long groused about using event charts and random tables in solo games. I still contend that using those elements to affect the core game mechanics is not a good idea, but I am liking it for modifying the scenario and battle environment.
Using the Warcry Battleplan Cards was also very easy to interpret to the Horse and Musket period. Sometimes it takes a bit of narrative to figure out how the units end up split to match the deployment card, but it is nothing significantly difficult.
I still have to question the casualty recovery. I am going to stick with the current recovery process just to see how it continues to play out. I don't want the forces to deplete too quickly, but there needs to be some consequence to battles, won or lost, doesn't there? As it stands, the original goal of the campaign was to provide interesting, linked battles and this has definitely filled the bill so far.
What do you think? Is this sort of battle report useful (for your own ideas on solo gaming)? Is it interesting? Do diagrams showing movement and firing convey more data than pictures of a game with miniatures? Do you look for battle reports with miniatures or do you view it as "eye candy"? My goal is to make posts that are both informative – in terms of how to game solo – as well as entertaining.
You put in a lot of work detailing the process. I will have to come back and read more thoroughly in order to comment .
ReplyDeleteThe use of skirmishers is tied to their weaknesses in the rules. I don't much care for the mounted skimishers as I understand them in your write up. The restriction of deploying in woods makes them all but useless under your casualty matrix for most games, it appears. Just first impressions.
ReplyDeleteYour use of the cards is creative, in running a large campaign with let us say, a dozen or so 'on the map' forces, you would need to keep a record of what, effect each card created.
I am not sure what you mean by "restriction of deploying into woods". That was a calculated choice, not a restriction on the troop type. By deploying into the woods not only do they suffer ½ casualties from fire, they are impervious to being charged by Cavalry, which cannot enter woods. When you have the choice to get that level of protection, you take it.
DeleteI'm not sure what you mean by the card comment either. Are you talking about the cards drawn for terrain in the first battle, or the Warcry cards to affect this battle? If the latter, I don't really need to interpret all of the cards, only as I use them.
I agree with pancerni that you have put a lot of work into this. I thought your questions deserved answers. The reports were interesting and useful. In the past - and I have a lot of past - I have tried campaigns but got bogged down in the detail. I think your map reports are perhaps easier to follow than pictures of a figure game. Although you wrote somewhere that you had a low opinion of TSWG you seem to be getting a lot of use out of it so I think I shall have to buy a copy (although the use of playing cards for terrain determination is not new and perhaps other mechanisms in the book will be familiar). As an aside, although not a fan of Piquet rules, the Season of Battle section of the latest version of Field of Battle seems to be very useful in that it provides a simple way to link battles and produce interesting scenarios. Haven't tried it yet though! Those are my thoughts for what they are worth and I shall certainly be very interested to read of developments. Thank you.
ReplyDeleteYeah, most of my campaigns in the past have bogged down in too much detail. Most have died due to other people dropping out though. That is why this one is solo.
DeleteAs for TSWG, I would agree with your assessment that many of these rules can be found elsewhere. My complaint about TSWG is lessened, but I still think it suffers from a lack of solid structure; it is more like a lot of connected ideas. Still, as an idea generator, it is worth the cheap price.
Next campaign, I assure you, will not be a hex map. Probably a "snake-and-ladders" type, or a point-to-point map campaign. I still think the best campaigns are probably hex-and-counter board games, where you play out the battles on the tabletop.
I bought several Piquet products, but never really played them. The campaign system might be worth the $25 to get the download. Thanks.
My best campaign was one based on the old Avalon Hill 1776 board game. This was before email and it was quite exciting opening up the letter with the next moves - my opponent was about 150 miles away. We played for years and had many battles, most solo but twice a year face to face.
DeleteTSWG has arrived today - very quick - and looks interesting. I used to be full of ideas but in old age an idea generator is very helpful.
I haven't found reviews of Season of Battle but understand there is a Facebook group (I don't do Facebook). The system is rather abstract with cards determining movement. The campaign map is a number of linked areas each of which is valued for the nature of the terrain and value to the side winning the battle. Each side has a number of 'national morale points' which gradually reduce depending on the results of the battles. For me, the system seems a straightforward way of coming up with tabletop battles but I should stress I have not actually used it yet so can't say if it would be worth $25 to you. I am sure you could apply the Warcry cards.
I really sould play more rather than read about what other folk are doing - but still look forward to your next.
Best wishes
Jim
I don't have AH 1776 any more. I do have the vintage Milton Bradley/American Heritage "Skirmish" game that I was thinking of using. Either that or "Liberty" by Columbia Games. I love the AWI. I was also considering Columbia Games' "Athens and Sparta" for a Hoplite campaign.
DeleteHi Dale,
ReplyDeletethis sort of battle report is definitely useful and entertaining for me - as you say, mostly as an inspiration for my own solo gaming. For example, I've found a way to convert OHW scenarios to hexes with no apparent distortion/information loss with respect to the rules as written; but the higher abstraction of your 6x6 maps appeals to me a lot and I'm tempted to try this approach too.
You asked whether diagrams convey more data than pictures of minis: absolutely yes, I'm 100% convinced of this. The blogosphere is full of AARs illustrated by dozens of dark/blurred photos of miniatures of various quality taken at different angles/zooms - I confess I cannot really follow what's happening in most of them. I really don't care for 'eye candy', but then a few years ago I've abandoned miniatures altogether in favour of kriegsspiel-like blocks.
Regarding OHW skirmishers, in my house rules I've made them more powerful (and - I think - closer to historical behaviour) in two ways: (1) their attacks are never halved by cover (they're sharphooters), and (2) they receive half hits from line infantry and artillery, but double hits from cavalry (their formation makes them more or less resilient to specific types of attack). I've detailed the reasoning for this in my (very seldom updated) blog.
Thank you, I really appreciate the feedback about battle reports. I skim battle reports too because I cannot follow reports using game shots of miniatures. Hell, when I take pictures of my own games I sometimes have trouble understanding what the picture is of, and I played the game!
DeleteFunny you mention blocks because the guy that made the comment to me about being disappointed that I was not using miniatures for these games has also switched to blocks! Go figure.
I'll have to take a look at your post. I generally try not to tweak OHW – even though it is so tweakable – and I find Skirmishers D6-2 x ½ casualties shooting at Cavalry versus Cavalry's D6+2 charging Skirmisher (at least during the Horse & Musket period) to be sufficiently deadly.
By the way, I forgot to mention, here was the first post (on my other blog) on why I went to grid with OHW. Initially Shaun Travers (my wargaming buddy in Australia) and I tried 3" squares and had a unit straddle two squares, but that was a pain in the butt. We went to 6" squares with each square holding one unit and life was grand.
Deletehttps://daleswargames.blogspot.com/2020/01/playing-one-hour-wargames-virtually.html
Hi Dale,
DeleteI'll definitely take a deep look into 6" squares. My first impression (correct me if I'm wrong) is that it's necessary to carefully consider ranges and stacking if one wants to distort OHW's scenarios and general gameplay as little as possible... For example, I think allowing only one unit per square makes concentration of force and 'traffic jam maneuvering' a lot more difficult/slow wrt vanilla OHW. Another detail I've pondered is that close combat should probably occur between units occupying the same square, because allowing hth attacks to affect adjacent squares would effectively add 6" to the range of charges with respect to shooting. It's a puzzle! :-)
I definitely agree re: changing OHW as little as possible. For this reason I've decided to limit my usual compulsive tweaking to attack ranges and damage rates only, without introducing any new rule. With skirmishers, the most important tweak is to make their attacks unaffected by cover - in this way, they become useful in assaulting BUAs (as they were historically). I like the unit interplay brought forward by the other tweak: skirmishers take half hits from 'normal' infantry, but not from other skirmishers. This makes them a nuisance to which massed infantry must react in some way - either retreat or drive them away - beacuse an exchange of long range shots will see them eventually losing. The other tweaks - including increased vulnerability to cavalry - are mostly cosmetic...
Thanks for your comments on my blog - I'll try to answer there!
Yes, I talk about maintaining the author's ratios in https://daleswargames.blogspot.com/2016/11/converting-rules-to-grid-and-small.html. I am always spouting off about it online when I see people asking questions about "can I use X basing in rules Y?"
DeleteNeil Thomas has very specific thoughts on concentration of force: he makes it hard. He does that with the Limited Engagement rule for close combat and by using short(ish) ranges that are only twice the length of the unit frontages.
Traffic jams in movement is very real and that showed up in this game: https://daleswargames.blogspot.com/2020/01/botched-relief-scenario-in-ohw-and.html. By using squares I basically stopped players from making mistakes by jamming up their units (which can happen, as in Agincourt, where the enemy can no longer maneuver). To me one unit per 6" square works on so many levels, because OHW does not allow units to interpenetrate (save when Skirmishers are involved), so when a unit pivots in a square it would never overlap. (I assume my units are about 5" wide.)
We require a unit to move into the enemy's square to enter close combat. We position the units in the center of the square normally, but the charger is moved to the edge. This tells us who initiated the combat. If the attacker wins, it is moved into the defeated enemy's square, as it has already paid for the movement. If the defender wins, however, it does not move into the attacker's square. Shaun Travers and I developed these rules some time ago. (I really need to find a place to store them. Probably the NT FB group Files section.)
I an unsure about the 1/2 casualties for Skirmishers in the open, especially as you grant it based on the attacker. Remember that Skirmishers are 1/2 the number of men. It might make sense in a straight OHW game, but in a campaign you might have twice the number of Skirmisher units. I will ponder it.
Hello Dale
ReplyDeleteI have been reading the various posts on the campaign and battles across both blogs but I am well behind on reading them that I feel too long had passed to comment. But on this one I can do so as you asked some questions. But firstly, OMG , the campaign seems complicated. Well at least in comparison to simple campaign rules :-) But on the other hand it does seem like it could be fun. And you get to check out various different mechanism along the way - already two different deployment and victory conditions.
Is this sort of battle report useful (for your own ideas on solo gaming)?
Hell yes. Extremely useful. For starter sI had never heard of the book or deployment cards, or using victory conditions from other rules. And methods of converting battle losses to campaign results is always useful.
Is it interesting?
Hell yes. Any post that displays the mechanisms in use and the reasoning behind what you did (e.g. listing out the 3 battle plans) is a winner for me.
Do diagrams showing movement and firing convey more data than pictures of a game with miniatures?
Yes but. Diagrams are very useful and succinct, and easier to so. But the same thing could possibly be done marking up images of the miniatures. But is more work. and also sometimes you made need a diagram as well anyway. lol. Stick with diagrams if easier as you can convey a lot that way.
Do you look for battle reports with miniatures or do you view it as "eye candy"?
Depends. I look for battle reports that are interesting and describe mechanisms and reasons. The pictures can sometimes assist that, or sometimes it is just eye-candy. Either way,it is the content of the post that gets me, not so much the miniature images. But a wall of text without diagrams/pictures to me makes a post a lot less interesting; this is the internet after all and I am trying to hang out with what the cool kids do these days (still haven't got into videos yet though).
Oh, and I was going to ask if you are using our (well, you did 95% of them) 6x6 OHW rules? I see by the comments you are.
Thanks for all of the feedback.
DeleteFor me, I find it easier to follow the action with diagrams. I also find it hard to photograph the miniatures on the game table, especially as lighting conditions change (I can play games over many hours or even days, as I am sure you do).
I think you are way too generous on my percentage of contribution there. I tried writing a generic, i.e. non-period specific, set of the rules. I need to finish those and post them to the FB group.